Uncategorized
Monitoring a Kubernetes Environment 
jcompeer@stackstate.com 30 Mar, 2017


Microservices are a modern software architecture where applications are built as small, independent services that work together to create a larger application. This is where Kubernetes shines.
Kubernetes excels at managing and orchestrating microservices. It allows developers to deploy each microservice as a separate unit, making them easy to update and scale without affecting the entire application. Kubernetes also ensures that the microservices can communicate with each other seamlessly.
As the number of microservices grows, managing them manually becomes cumbersome. Kubernetes automates the process of scaling, load balancing, and monitoring these microservices, making it much more efficient and reliable. It helps developers focus on building and improving the individual services while leaving the operational complexities to Kubernetes.
The Certified Kubernetes Application Developer (CKAD) is one of the certification exams offered by the Cloud Native Computing Foundation (CNCF) and it aims to validate the skills of developers when working with Kubernetes.
The exam focuses on practical skills, best practices and real world experience with Kubernetes resources and concepts, such as pod deployment, application lifecycle management, networking, storage, security, and troubleshooting.
For example, imagine that a pod was created but it is failing during the startup. Your job will be to inspect the root cause and fix it.
Before starting the exam, you will need to download a specific browser provided by PSI (a company leader in the assessment industry). In my first attempt to do it, I was trying to install it using the corporate laptop, but it had some custom policies which were conflicting with the browser. Make sure your computer/laptop is compliant with the PSI browser or you won’t be able to launch the exam.
The exam is a collection of 15-20 exercises, and you have two hours to complete it. It is 100% hands-on, and you need to score 66% or above to earn the certification. If you have experience with Kubernetes, you probably just need to review what’s new or what has been deprecated in the current Kubernetes version. Also, it is worth it to review a few commands that you probably don’t use often in your daily activities.
My first engagement when I started at Xebia | Xpirit was a large migration from AWS to Azure. I acquired some knowledge on Kubernetes while working on this project but my peers were already familiar with the ecosystem. For someone with almost no knowledge on Kubernetes to suddenly get exposed to Helm and advanced Kubernetes concepts, I realized there was a gap in my knowledge. I decided to dive deep and learn Kubernetes for real. After some research, I bought the book Kubernetes in Action from Manning and some training courses from KodeKloud and Linuxtips (the second one is available in Portuguese only).
Although you don’t need to purchase the training courses, I thought study through them would accelerate my learning process. Besides the great explanations, both platforms offer real labs where you will connect to their Kubernetes cluster and perform the exercises. This experience is similar to the real exam, so I recommend them.
Another useful resource I used was Docker Desktop. After installing it, you can enable Kubernetes and it will provision a local cluster for you:
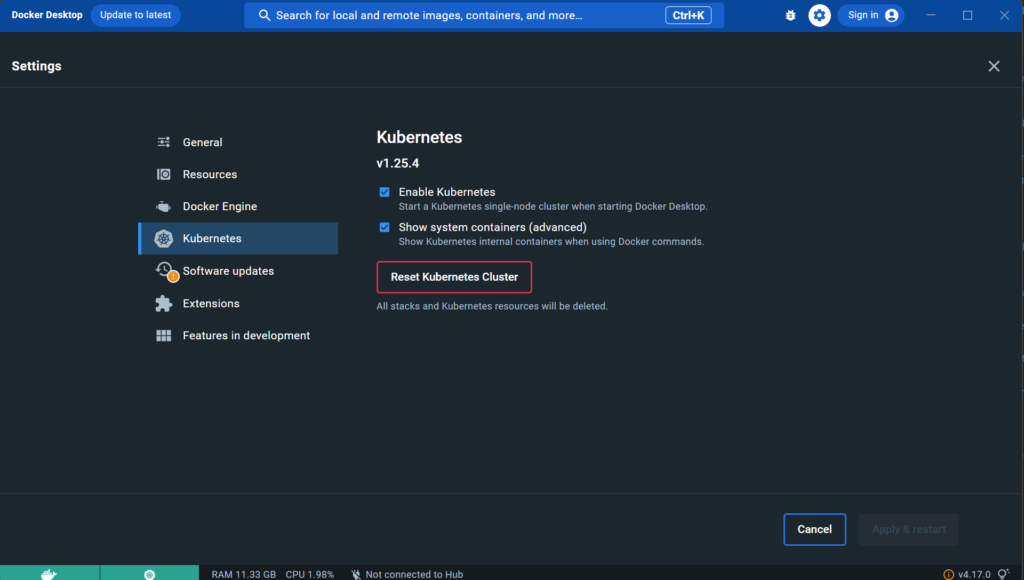 Figure 1: enable Kubernetes using Docker Desktop
You can also use Minikube or Kind in order to create a local cluster. If you have a valid subscription you can create a managed Kubernetes cluster on Azure, but make sure you delete all the resources after using it, or it will consume your Azure credits. You can get more information about how to create a local Kubernetes cluster in the following links:
Every little second counts, so it is important to learn how to solve the problems as fast as possible and get familiar with techniques which will save you time. A few tips I can give on this:
When creating resources in Kubernetes, you can either type the entire yaml file, or use the kubectl to generate a yaml file with the parameters you specify. For example:
kubectl run mypod --image=nginx -n test --dry-run=client -o yaml > generated.yaml
The previous command will produce the following yaml file:
<span id="cb1-1"><a href="#cb1-1" aria-hidden="true"></a><span class="fu">apiVersion</span><span class="kw">:</span><span class="at"> v1</span></span>
<span id="cb1-2"><a href="#cb1-2" aria-hidden="true"></a><span class="fu">kind</span><span class="kw">:</span><span class="at"> Pod</span></span>
<span id="cb1-3"><a href="#cb1-3" aria-hidden="true"></a><span class="fu">metadata</span><span class="kw">:</span></span>
<span id="cb1-4"><a href="#cb1-4" aria-hidden="true"></a><span class="at">  </span><span class="fu">creationTimestamp</span><span class="kw">:</span><span class="at"> </span><span class="ch">null</span></span>
<span id="cb1-5"><a href="#cb1-5" aria-hidden="true"></a><span class="at">  </span><span class="fu">labels</span><span class="kw">:</span></span>
<span id="cb1-6"><a href="#cb1-6" aria-hidden="true"></a><span class="at">    </span><span class="fu">run</span><span class="kw">:</span><span class="at"> mypod</span></span>
<span id="cb1-7"><a href="#cb1-7" aria-hidden="true"></a><span class="at">  </span><span class="fu">name</span><span class="kw">:</span><span class="at"> mypod</span></span>
<span id="cb1-8"><a href="#cb1-8" aria-hidden="true"></a><span class="at">  </span><span class="fu">namespace</span><span class="kw">:</span><span class="at"> test</span></span>
<span id="cb1-9"><a href="#cb1-9" aria-hidden="true"></a><span class="fu">spec</span><span class="kw">:</span></span>
<span id="cb1-10"><a href="#cb1-10" aria-hidden="true"></a><span class="at">  </span><span class="fu">containers</span><span class="kw">:</span></span>
<span id="cb1-11"><a href="#cb1-11" aria-hidden="true"></a><span class="at">  </span><span class="kw">-</span><span class="at"> </span><span class="fu">image</span><span class="kw">:</span><span class="at"> nginx</span></span>
<span id="cb1-12"><a href="#cb1-12" aria-hidden="true"></a><span class="at">    </span><span class="fu">name</span><span class="kw">:</span><span class="at"> mypod</span></span>
<span id="cb1-13"><a href="#cb1-13" aria-hidden="true"></a><span class="at">    </span><span class="fu">resources</span><span class="kw">:</span><span class="at"> </span><span class="kw">{}</span></span>
<span id="cb1-14"><a href="#cb1-14" aria-hidden="true"></a><span class="at">  </span><span class="fu">dnsPolicy</span><span class="kw">:</span><span class="at"> ClusterFirst</span></span>
<span id="cb1-15"><a href="#cb1-15" aria-hidden="true"></a><span class="at">  </span><span class="fu">restartPolicy</span><span class="kw">:</span><span class="at"> Always</span></span>
<span id="cb1-16"><a href="#cb1-16" aria-hidden="true"></a><span class="fu">status</span><span class="kw">:</span><span class="at"> </span><span class="kw">{}</span></span>
I don’t know how fast you can type, but in my case kubectl saved me a lot of time. It worths to mention that the parameter dry-run=client will not create any resource in Kubernetes, so it is useful to validate before deploying resources and to save you some time avoiding the typing of the entire yaml file.
Some exercises will ask you to change a resource which already exists. You can either use kubectl edit or kubectl get with the option to get the output in yaml format and redirect it to a file:
kubectl get pod mypod -o yaml > existing.yaml
The previous command will download all the details and specifications of the selected pod (‘mypod’) and create the file ‘existing.yaml’ with its content. You can now open the ‘existing.yaml’ and perform the changes requested. After that, you can use kubectl replace which will delete and create the resource:
kubectl replace --force -f existing.yaml --grace-period=0
PS: The grace period parameter is used to specify the period of time in seconds given to the old resource to terminate gracefully.
You can use other text editor rather than Vi. I did my exam using Vi, but even if you opt to use a different one, it is important to learn how to be productive on it. Learning how to select and replace multiple instances of a given text, add or remove indentation on multiple lines, cut and paste multiple lines respecting the indentation are some of the tips I can give on this topic.
During the exam, you are free to open the Kubernetes Documentation. Sometimes it will contain exactly what you need, but in other cases, it will give you an explanation but will not give you a concrete example. For those cases, you can use kubectl explain and navigate through the documentation.
For example, let’s say you will need to add an environment variable for a pod, but you can’t remember where to place them in the yaml file. You can use kubectl explain with the recursive option:
kubectl explain pod --recursive
This will give you a lot of information. All you must do is navigate through hierarchy:
pod -> spec -> containers -> env
kubectl explain pod.spec.containers.env --recursive
This will give you the structure / valid parameters for that section:
FIELDS:
   name <string>
   value        <string>
   valueFrom    <Object>
      configMapKeyRef   <Object>
         key    <string>
         name   <string>
         optional       <boolean>
      fieldRef  <Object>
         apiVersion     <string>
         fieldPath      <string>
      resourceFieldRef  <Object>
         containerName  <string>
         divisor        <string>
         resource       <string>
      secretKeyRef      <Object>
         key    <string>
         name   <string>
optional <boolean>It is hard to be ready for a topic such as Kubernetes as it is an extensive topic. My recommendation is for you to try the previous tips and explore the possibilities. For example, create a pod with a single environment variable. After that, create another one, exposing Config Maps as environment variables. Then another one, but this time exposing Secrets as environment variables. Lastly, learn how to select a subset of items from secrets / config maps and expose them using a different name than what is in the Config Map / Secret.
I use this technique in many areas of my life. It is a ‘drill’ where you exercise something on and on with small variations. Do it until it becomes natural due to the amount of repetition you did during the drills.
You can get more information about the exam at the official website: https://bit.ly/CKAD-EXAM
Kubernetes is an advanced topic. I studied for months in order to succeed on this exam. You must not only master the concepts, but be able to solve the problems within the exam duration. I’ve shared useful tips which will save you time even in your daily Kubernetes activities.
Feel free to connect with me on Linkedin or Twitter. I will be interested to know your thoughts on the tips I’ve shared in here. If you have plans to take the exam, I wish you good luck!
Stay Hungry, stay foolish!
This article is part of XPRT. Magazine #15 Download here