Netherlands | Team location
How to use Azure Infrastructure as Code with ARM templates and Bicep Vivian Andringa 14 Jul, 2022


On Azure, three of the most obvious choices for Infrastructure as Code (IaC) are Bicep, Terraform, and Pulumi. Bicep is Microsoft’s own domain-specific language, whereas Terraform is the open-source tool that is cloud agnostic. Where Bicep and Terraform both have their own language, Pulumi allows you to write your Infrastructure as Code using your favorite language like C#, Python, or Go.
The goal of this article is to compare the three tools and leave you with enough understanding of each of them to make a good choice when it comes to an Infrastructure as Code tool for your next project. We will, of course, talk about the features of each of these tools but, more importantly, will also compare the developer experience with each of them. Let’s dive in and see who will be the last one standing and who will throw in the towel first.
Before we start comparing the three contestants of today, let them first all properly introduce themselves.
Bicep is a domain specific language (DSL) created by Microsoft. It is their answer to the problems we had with its predecessor, ARM templates. ARM templates have been around for many, many years. Describing your IaC in ARM templates was done using JSON. That made ARM templates very verbose, hard to read, and even harder to maintain. Splitting up a template into multiple smaller, reusable components was way too hard. Bicep is here to solve those problems and it really does make our life easier. Unlike the other two tools in this contest, Bicep can only be used to configure resources on Azure. More on that later. A very simple Bicep template looks like this:
@description('The name of the storage account')
param name string

@description('Azure region of the deployment')
param location string

@allowed([
  'Standard_LRS'
  'Premium_LRS'
])
@description('Storage SKU')
param storageSkuName string = 'Standard_LRS'

resource storage 'Microsoft.Storage/storageAccounts@2021-09-01' = {
  name: name
  location: location
  sku: {
    name: storageSkuName
  }
  kind: 'StorageV2'
  properties: {
    accessTier: 'Hot'
    allowBlobPublicAccess: false
    allowCrossTenantReplication: false
    allowSharedKeyAccess: true
    minimumTlsVersion: 'TLS1_2'
    supportsHttpsTrafficOnly: true
  }
}

output storageId string = storage.id
The above example deploys a storage account on Azure. It gets a few inputs, specifies the resource, and returns an output that can be used by other templates or scripts.
Terraform is an open source IaC tool owned by HashiCorp. It was created in 2014 and, like Bicep, is a DSL. A big difference between Bicep and Terraform is that Terraform can manage infrastructure on all big cloud platforms and other services. What we in Terraform call ‘Providers’ enable Terraform to work with virtually any platform or service with an accessible API. These providers are often created by the owner of the targeted platform but there are also numerous providers created by the community. Most of them are open source. You could even build your own if you need to. The example below creates a storage account using Terraform.
terraform {
  required_version = ">= 1.1.7"

  required_providers {
    azurerm = {
      source  = "hashicorp/azurerm"
      version = ">= 3.27.0"
    }
  }
}

provider "azurerm" {
  features {}
}

variable "name" {
  type = string
}

variable "resource_group_name" {
  type = string
}

resource "azurerm_storage_account" "storage" {
  name                     = var.name
  resource_group_name      = var.resource_group_name
  location                 = "westeurope"
  account_tier             = "Standard"
  account_replication_type = "LRS"
}

output "storageId" {
  value = azurerm_storage_account.storage.id
}
As you can see, this configuration is slightly more complex compared to the Bicep version which has the same result. In Terraform you first need to configure a provider since you could be working with one or more providers. A provider could have a specific configuration, hence the ‘azurerm’ provider block. Defining a variable is a bit more verbose. You can, unlike in Bicep, move them into a different file which could increase readability. The same goes for outputs, the terraform block or the provider configuration.
Pulumi is our third contestant of today. It was named after the company that created it in 2018. What makes Pulumi different is that it allows you to write your infrastructure as code in your favorite language: TypeScript, JavaScript, Python, Go, .NET, Java, and YAML. Like Terraform, it allows you to manage infrastructure on basically any cloud or service provider. Even if it is not supported by default, you could always easily create your own code to interact with a service provider’s API. The example below creates a Storage Account in Azure using C# and Pulumi.
using Pulumi;
using Pulumi.AzureNative.Resources;
using Pulumi.AzureNative.Storage;
using Pulumi.AzureNative.Storage.Inputs;
using System.Collections.Generic;

return await Pulumi.Deployment.RunAsync(() =>
{
    var config = new Pulumi.Config();

    // Create an Azure resource (Storage Account)
    var storageAccount = new StorageAccount(config.Get("storageAccountName"), new StorageAccountArgs
    {
        ResourceGroupName = config.Get("resourceGroupName"),
        Sku = new SkuArgs
        {
            Name = SkuName.Standard_LRS
        },
        Kind = Kind.StorageV2
    });

    // Export the primary key of the Storage Account
    return new Dictionary<string, object?>
    {
        ["storageId"] = storageAccount.Id
    };
});
The first thing you need to do here is grab the Nuget package for Azure. From there, every resource is created by instantiating an instance of a specific class and passing in a few parameters.
You might be wondering, wasn’t there a version of Terraform in which I can use a programming language as well? Yes, that is true! It is called Terraform CDK (Cloud Development Kit). I have left it out for a few reasons. The most important one is that I simply have never used it. I personally don’t see it used in the wild often. That might be because the product has not reached version 1.0 yet and Terraform itself warns for breaking changes. It also supports a few less languages compared to Pulumi.
An important consideration while picking any of these tools is what platforms you are deploying onto. Two of the three tools we discuss here, Terraform and Pulumi, have multi cloud support. That means that they can interact with multiple cloud providers and services. You could, for example, create an App Service in Azure and then pass that URL to Cloudflare to register in DNS. As you see, that is not limited to the just the three big cloud vendors but includes monitoring tools, DNS providers, GitHub, Azure DevOps, and much more. A downside can be that these tools do not always support every feature of a cloud vendor or do not support a new feature on launch day. These services often rely on the community to implement features. For Terraform you need to wait for the provider to be updated. Since they are mostly open source you can do that yourself of course. Pulumi uses two types of providers, “bridged” providers which use Terraform providers to map out the different functions available for each API on the cloud provider, or “native” providers which map out the functions directly from the Cloud Provider API. With the bridged providers you obviously have the same issues as with Terraform native. For the Azure provider that is not the case since it is a native provider. It is updated every night automatically by recreating it against the Azure APIs.
To give you an idea of what a multi cloud implementation could look like in these tools, let’s start with an example in Terraform. The below code will create an Azure App Service and configure a custom domain on it. The domain is registered with Cloudflare.
resource "azurerm_service_plan" "app_service_plan" {
  name                = "asp-${var.project_name}-${var.environment}"
  resource_group_name = var.resource_group_name
  location            = var.location
  os_type             = "Linux"
  sku_name            = "B1"
}

resource "azurerm_linux_web_app" "app_service" {
  name                      = "app-${var.project_name}-${var.environment}"
  resource_group_name       = var.resource_group_name
  location                  = var.location
  service_plan_id           = azurerm_service_plan.app_service_plan.id

  site_config {}
}

resource "cloudflare_record" "domain-verification" {
  zone_id = "72e0e6d795ec809b9158033c4a4c73d3"
  name    = "asuid.tf-demo.staal-it.nl"
  value   = azurerm_linux_web_app.app_service.custom_domain_verification_id
  type    = "TXT"
  ttl     = 3600
}

resource "cloudflare_record" "cname-record" {
  zone_id = "72e0e6d795ec809b9158033c4a4c73d3"
  name    = "tf-demo.staal-it.nl"
  value   = azurerm_linux_web_app.app_service.default_hostname
  type    = "CNAME"
  ttl     = 3600
}

resource "azurerm_app_service_custom_hostname_binding" "hostname-binding" {
  hostname            = "tf-demo.staal-it.nl"
  app_service_name    = azurerm_linux_web_app.app_service.name
  resource_group_name = var.resource_group_name

  depends_on = [
    cloudflare_record.domain-verification,
    cloudflare_record.cname-record
  ]
}
First, the app service plan and the web app itself are created. Next, we create the two records in Cloudflare. You can distinguish the two providers we use by looking at the name of the type we create. Stuff for Azure starts with ‘azurerm’, stuff for Cloudflare with ‘cloudflare’. The last step is to set the domain on the App Service ones they exist in Cloudflare. Using Pulumi and C#, the exact same functionality is achieved using the following code:
using Pulumi;
using Pulumi.AzureNative.Web;
using Pulumi.AzureNative.Web.Inputs;

class AppService : Pulumi.ComponentResource
{

    [Output("AppServiceEndpoint")]
    public Output<string> AppServiceEndpoint { get; private set; }

    public AppService(string name, AppServiceArgs args, ComponentResourceOptions? opts = null)
        : base("azure:custom:appservice", name, opts)
    {
        var appServicePlan = new AppServicePlan($"asp-{name}", new AppServicePlanArgs
        {
            ResourceGroupName = args.ResourceGroupName,
            Kind = "App",
            Sku = new SkuDescriptionArgs
            {
                Tier = "Basic",
                Name = "B1",
            },
        }, new Pulumi.CustomResourceOptions { Parent = this });

        var app = new WebApp($"app-{name}", new WebAppArgs
        {
            ResourceGroupName = args.ResourceGroupName,
            ServerFarmId = appServicePlan.Id
        }, new Pulumi.CustomResourceOptions { Parent = this });

        AppServiceEndpoint = app.DefaultHostName;

        var domainVerification = new Pulumi.Cloudflare.Record("domain-verification", new Pulumi.Cloudflare.RecordArgs
        {
            Name = "asuid.pulumi-demo.staal-it.nl",
            ZoneId = "72e0e6d795ec809b9158033c4a4c73d3",
            Type = "TXT",
            Value = app.CustomDomainVerificationId,
            Ttl = 3600,
        }, new Pulumi.CustomResourceOptions { Parent = this });

        var record = new Pulumi.Cloudflare.Record("record", new Pulumi.Cloudflare.RecordArgs
        {
            Name = "pulumi-demo",
            ZoneId = "72e0e6d795ec809b9158033c4a4c73d3",
            Type = "CNAME",
            Value = app.DefaultHostName,
            Ttl = 3600,
        }, new Pulumi.CustomResourceOptions { Parent = this });

        var exampleCustomHostnameBinding = new WebAppHostNameBinding("exampleCustomHostnameBinding", new()
        {
            HostName = "pulumi-demo.staal-it.nl",
            Name = app.Name,
            ResourceGroupName = args.ResourceGroupName,
        }, new CustomResourceOptions { DependsOn = { domainVerification, record }, Parent = this });

        this.RegisterOutputs();
    }
}
Our last contender, Bicep, is always on par with any feature available in the Azure cloud on launch day. For Bicep, that is a lot easier since it is a single cloud tool built and maintained by Microsoft itself. A big downside of this single cloud tool is that you are limited to managing your Azure infrastructure. More specifically, you can only interact with what we call the Azure control plane. Azure operations can be divided into two categories – control plane and data plane. Simply put, you use the control plane to manage resources in your subscription, you use the data plane to manage the internals of a resource. For example, Bicep allows you to create a SQL Database but does not let you create a user in that database. Bicep also does not let you interact with Active Directory. Creating an Enterprise Application and using it in your IaC is not an easy task. There are mainly two alternative approaches here; run some code in your CI/CD pipeline and feed the result to Bicep on deploy or use the DeploymentScripts resource. The DeploymentScripts resource allows you to run an Azure CLI or PowerShell script during the execution of Bicep. We could use that to accomplish the example with Cloudflare we saw in Terraform and Pulumi. What happens under the hood when you use a DeploymentScripts resource is that an Azure Container Instance will be created, and a container will be deployed to run your script. This is slow and does not support enterprise features like network integration. This often limits the use of that resource.
Creating the App Service and records in Cloudflare using Bicep would look like this:
param name string
param location string
param cloudFlareToken string

var record = 'bicep-article-demo'
var domain = 'staal-it.nl'

resource appServicePlan 'Microsoft.Web/serverfarms@2019-08-01' = {
  name: 'asp-${name}'
  location: location
  sku: {
    name: 'B1'
    capacity: 1
  }
}

resource webApplication 'Microsoft.Web/sites@2018-11-01' = {
  name: 'app-${name}'
  location: location
  properties: {
    serverFarmId: appServicePlan.id

    siteConfig: {
      netFrameworkVersion: 'v6.0'
    }
  }
}

resource cloudflare 'Microsoft.Resources/deploymentScripts@2020-10-01' = {
  name: 'cloudflare'
  location: location
  kind: 'AzurePowerShell'
  properties: {
    forceUpdateTag: '1'
    azPowerShellVersion: '8.3'
    arguments: '-hostname "${record}" -domain "${domain}" -destination "${webApplication.properties.defaultHostName}"'
    environmentVariables: [
      {
        name: 'CLOUDFLARE_API_TOKEN'
        secureValue: cloudFlareToken
      }
    ]
    scriptContent: '''
      param([string] $hostname, [string] $domain, [string] $destination)

      $zoneid = "72e0e6d795ec809b9158033c4a4c73d3"
      $url = "https://api.cloudflare.com/client/v4/zones/$zoneid/dns_records"

      $addresses = (
          ("awverify.$hostname.$domain", "awverify.$destination"),
          ("$hostname.$domain", "$destination")
      )

      foreach($address in $addresses)
      {
          $name = $address[0]
          $content = $address[1]
          $token = $Env:CLOUDFLARE_API_TOKEN

          $existingRecord = Invoke-RestMethod -Method get -Uri "$url/?name=$name" -Headers @{
              "Authorization" = "Bearer $token"
          }

          if($existingRecord.result.Count -eq 0)
          {
              $Body = @{
                  "type" = "CNAME"
                  "name" = $name
                  "content" = $content
                  "ttl" = "120"
              }

              $Body = $Body | ConvertTo-Json -Depth 10
              $result = Invoke-RestMethod -Method Post -Uri $url -Headers @{ "Authorization" = "Bearer $token" } -Body $Body -ContentType "application/json"

              Write-Output $result.result
          }
          else
          {
              Write-Output "Record already exists"
          }
      }
    '''
    supportingScriptUris: []
    timeout: 'PT30M'
    cleanupPreference: 'OnSuccess'
    retentionInterval: 'P1D'
  }
}

resource symbolicname 'Microsoft.Web/sites/hostNameBindings@2022-03-01' = {
  name: '${record}.${domain}'
  parent: webApplication

  dependsOn: [
    cloudflare
  ]
}
As you can see, we need a lengthy PowerShell script that we had to write ourselves to get done what the other tools nicely abstracted away for us. You also do need to know another language and tooling to get the same result.
An important difference between these three tools is the language they give you to write your Infrastructure as Code. Both Terraform and Bicep are what we call a Domain Specific Language (DSL). A DSL is what you would think it is; a language created for a very specific domain. In general, these DSLs are a bit easier to learn compared to a Programming Language (we will talk about programming languages in a bit). That is partly because they are less complete and guide you a bit more in a certain direction of doing things. That is not to say that they are easy. You still need to know how to properly structure things not to make a big mess out of your IaC.
What sets Pulumi apart from the other two tools is you can use your favorite programming language to write your IaC. You can use Java, Node, Python, .NET (F#, C#, VB) or GO. Any of these languages are way more flexible than a DSL. They are better known by more people, well supported in a wide range of IDE’s and other tooling, and communities around them tend to be much larger. A downside could be that a programming language is harder to learn. You need to be quite an experienced developer to write maintainable and testable code, for example. The power and flexibility, however, you get with a programming language gives you unlimited expressiveness and control far beyond what Bicep and Terraform could offer. You could use different tools like Azure App Configuration to store your configuration, use Key Vault to store secrets, or use feature flags to hide new infrastructure or only deploy that for a specific client first. It is also very easy to incorporate Pulumi code in a tool you build. If you are a platform team building a self-service portal, Pulumi could be integrated to handle the deployment to various services. Onboarding a new team could be a single click of a button that creates a repository in GitHub, create a subscription in Azure, creates the connection between GitHub and Azure, and set the correct permissions on both environments.
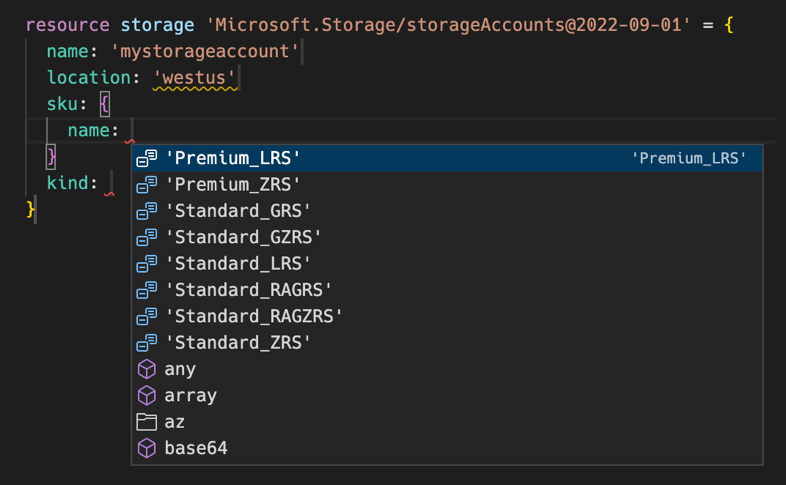
A big part of the developer experience is the availability of proper support in your favorite IDE and additional tooling. Starting with Bicep we can say that support in VS Code is really good after installing the extension. It supports validation, Intellisense, Snippets, Code navigation, code completion, formatting and even a few quick fixes when making a typo, for example. A feature I often use is the completion of a resource using the ‘required-properties’ option. That will be presented to you when creating a resource as shown below:
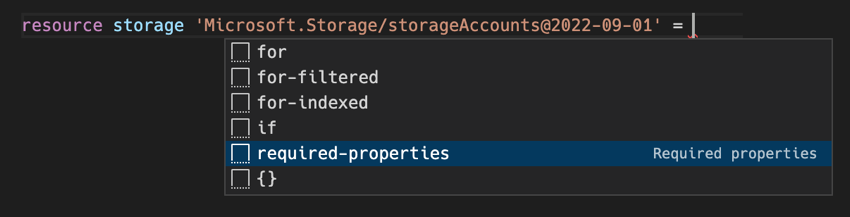
When I hit enter, the complete resource will be created, and I get to fill in the blanks that are required. It then also helps me to fill in the correct value for properties that have a defined list of allowed values preventing me from picking the wrong option or making a typo.
Another interesting feature is the one that allows you to import an existing Azure resource. You provide the identifier, and the bicep template will be generated. That is a quick win when you want to create infrastructure as code for resources that were created manually in the past.
The VS Code extension for Terraform is not as complete as the one for Bicep. It should support things like Intellisense but I find it lacking quite regularly. It does support snippets but only for a limited set of its built-in features such as using a for-each or creating a variable. It does not have snippets for specific resources. That, of course, makes sense since it would then need to support snippets for many, many providers. There are extensions for that, but you need to find and install them yourself and, at least for Azure resources, they are not as complete as in Bicep. Something like presenting a list of options for a well-known value like the storage SKU in the above Bicep example is not available in at least three extension that I’ve tried.
The developer experience in the IDE for Pulumi is completely different. It depends on the language you choose to write your IaC in and the editor that you use. The experience is no different than writing any application using that tool and IDE. I can only speak for C# in combination with VS Code, Jetbrains Rider or the full version of Visual Studio. What I find is the developer experience is way better than for the other two tools. A full-fledged IDE like Rider or Visual Studio in combination with a powerful language is simply hard to beat.
If we look beyond the IDE at additional tooling, then we see that Terraform does a really good job. There are tons of additional tools out there that help you keep things manageable and secure. To name a few: there is TFLint (A static analysis tool for Terraform code that helps you detect and fix style issues, syntax errors, and best practices violations), TFSec (Uses static analysis of your terraform code to spot potential misconfigurations), terratest (a Go library that provides patterns and helper functions for testing infrastructure), checkov (Checkov is a static code analysis tool for infrastructure as code) and terraform-docs (Generates Terraform modules documentation in various formats). All these tools nicely integrate with git pre-commit allowing you to prevent unwanted code in your main branch.
Bicep is a bit behind but is quickly catching up here. Quite recently, for example, support for checkov was added. Integrated into Bicep itself is a linter that has quite a few rules that are checked automatically. For those that worked with ARM Templates, these rules are the same as in the ARM Template Toolkit. Bicep is also supported by PSRule, a cross-platform PowerShell module to validate infrastructure as code. It currently has over 250 rules for best practices defined by Microsoft. PSRule also allows you to write your own tests and thus is extensible. Since Bicep is transpiled (Transpiling is a specific term for taking source code written in one language and transforming into another language that has a similar level of abstraction.) into an ARM template, any tool that is supported there is supported for Bicep although that is not always ideal since you then get your results on a generated ARM template instead of your specific Bicep template.
The ecosystem for Pulumi seems to be a lot smaller compared to the other two tools. Of course, you can use more general tools that would work with your language of choice. A testing framework is a good example. I have not found any security scanner like TFSec or SonarCloud, that supports Pulumi. SonarCloud, for example, could scan your C# code, but it will not look at how you specifically configure a storage account.
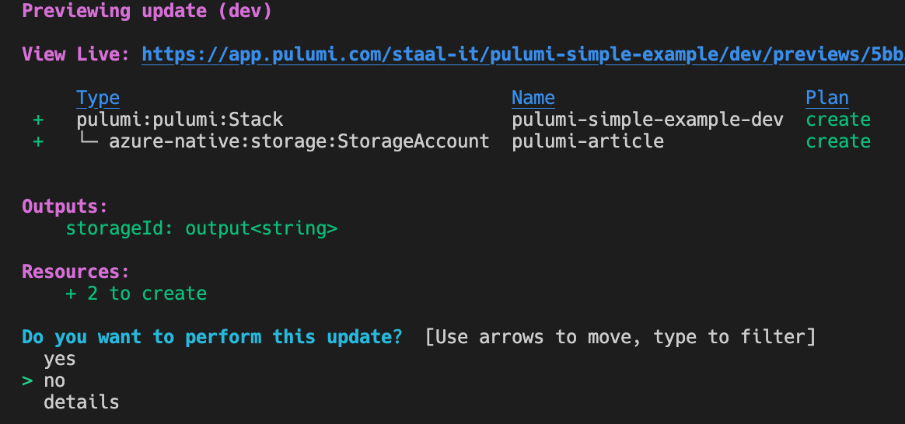
Creating infrastructure with any of these tools starts with writing the code. When you want to deploy that code, things look a little different. Terraform and Pulumi both take the default route of first figuring out what needs to change, show you that result, ask you whether that is correct, and then allow you to confirm or abort the deployment. In Terraform you often use the ‘terraform plan’ command to figure out what needs to change, and then run the ‘terraform apply’ command to apply the changes. Pulumi has similar functionality. Below is an example on what Pulumi would present us when we deploy a simple storage account as you’ve seen in the introduction of Pulumi.
Pulumi and Terraform can give you this functionality because they store every single detail of the infrastructure you deploy in what we call a state file. That allows them to compare your current templates with what should be deployed and what the configuration in your cloud or services is. That does mean that this state needs to be stored somewhere. Both tools offer a SaaS service to handle that for you, which they obviously charge you for. You can also store these state files in, for example, an Azure storage account. You do need to keep them secure since, especially for Terraform, they do contain plan text password and keys.
Bicep does not know this state thing. Azure is its state. Whenever you run a deployment, your Bicep templates will be compared with the current state in Azure and changes will be applied. You can, optionally, use the -what-if flag. That will then show you what changes will be made. That feature, however, still contains a few bugs and therefore is not as reliable as in the other two tools (1).
Another difference with the other two tools is where the changes are being executed: server-side or client side. Bicep is run server-side. Your Bicep templates are transpiled into ARM and then sent to the Azure Resource Manager. The other two tools execute your changes locally using their engines by calling APIs. That has a few advantages. One of them, for example, is that Terraform and Pulumi allow you to wait for x amount of time between the deployment of two resources. That can sometimes be convenient when assigning permissions and waiting for a few seconds before those are in effect. Bicep does not offer such a feature.
(1): https://aka.ms/WhatIfIssues
As with writing any piece of software, when writing your IaC you will run into trouble, get errors that you cannot explain or have questions on how to best do things. It is therefore essential that the weapon of choice here has a large and vivid community to which you can reach out. It is a bit hard to quantify large and vivid. What I have done is look at both the search trends in Google and StackOverflow. Let’s start with the first one. When we look at the number of questions posted using a specific tag then we see the following data:
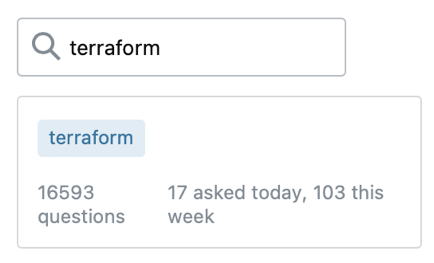
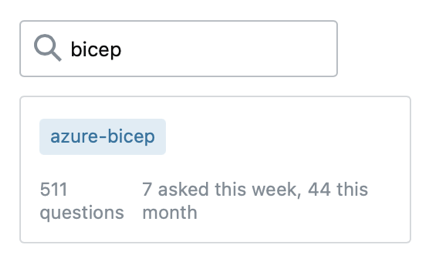
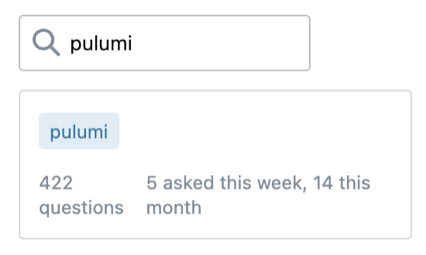
What we learn from this is Terraform has the most questions and activity on the platform by far. Results for Bicep and Pulumi are quite similar. We do have to point out here that the questions for Bicep will, of course, be also always Azure specific. That will not be the case for Pulumi, so there might be fewer relative questions and answers there.
The next graph shows Google search trends for the following three keywords over the last year: azure bicep (just bicep gives a lot of other results as you can imagine…), Terraform and Pulumi.
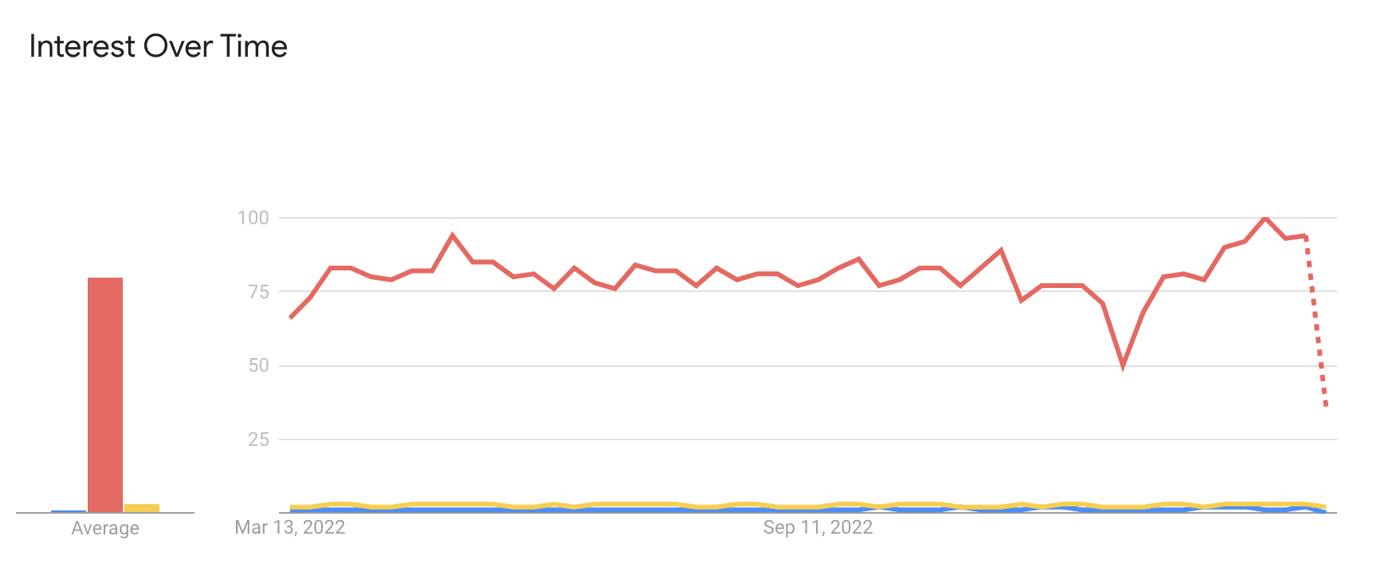
Red: Terraform, Blue: Bicep, Yellow: Pulumi
What we see here is that, again, Terraform is by far the biggest in terms of being searched for on Google. Bicep and Pulumi are so far behind that we cannot get any useful numbers for them from this graph. The next graph shows only Bicep and Pulumi for the last 5 years.
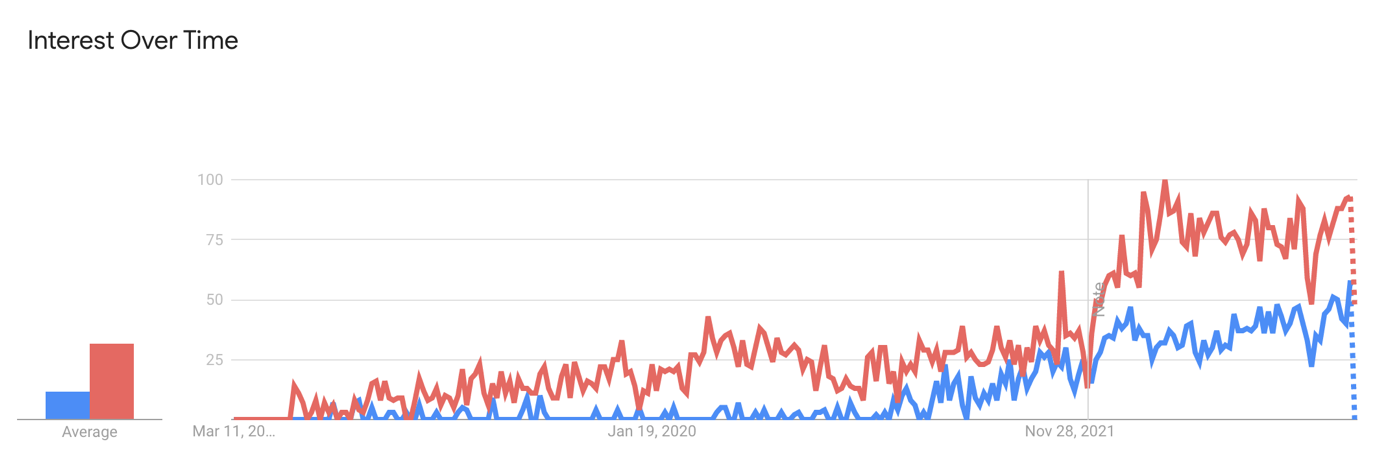
Red: Pulumi, Blue: Bicep
What we see here is Pulumi is more popular compared to Bicep at a first glance. When we do consider that the target audience for Pulumi is way bigger, you could argue that you probably get better results for Bicep as they will be more relevant to you. The upwards trend is quite similar for all three tools.
Now that we’ve looked at these three tools from different angles, it is time to name the winner. Unfortunately, as always, that depends on various factors. Let’s start with Bicep. I find it to be the easiest tool to learn and explain to others. Tooling is good, and it is very easy and quick to deploy your first resource. Not needing to store state somewhere is a small plus. It can only configure items in the Azure cloud which very much limits its use-cases. I would pick Bicep when working on small environments only in the Azure cloud with an in-experienced team.
Terraform is much more powerful and therefor a good choice for more advanced environments that span multiple cloud or service providers. It also lets you configure the internals of a resource (remember the control plane vs data plane discussion with Bicep?) allowing you to really configure your infrastructure end-to-end using a single language. With power comes complexity and responsibility. Having to manage state and learn to work with it makes Terraform have a bit steeper learning curve compared to Bicep. I would go for Terraform for any project that is not super simple, unless…
Pulumi is by far the most powerful tool of the three. The expressiveness, power, and freedom a programming language offers is unparalleled. If you can live with a smaller ecosystem, which might change, and have engineers that know how to use a programming language, Pulumi would be my weapon of choice.
All code used in this article can be found here
Want to expand your knowledge on Azure?
Learn more, book a training