

Share 


An article that teaches you how to test your endpoints using OpenID Connect. All without changing or mocking the authentication and authorization configurations in dotnet 6.
When creating new applications or updating existing applications, we have to take security into account. The protocol we will use in this article is OpenID Connect flow.
The OpenID Connect flow is a protocol used for authentication and authorization between different parties, such as a client application and a server providing identity services.
Having a realistic testing environment early on allows for more accurate testing of the application’s behavior. This can help identify issues related to the authentication and authorization process that may not be apparent in a test environment with different settings.
It will ensure that the application is secure and compliant with industry standards on a CI-pipeline.
A tale on how it can help you…
A customer required support for two identity providers to access our resource server, and our developer implemented the corresponding authentication schemes. Later, the requirement changed to support only one identity provider and the relevant code was removed. Everything seemed to be functioning well until another team attempted to access the resource server, unaware that the second identity provider was no longer supported. In this situation, a HTTP status code 401 (Unauthorized) would be expected. However, due to incomplete code removal, a HTTP 500 (Internal Server Error) was encountered instead. By incorporating the testing methods outlined in this article, we gained insight into what happened and fixed the situation.
Testing isolation
There are various categories of tests, each serving distinct purposes: Unit Testing, Integration Testing, System Testing, Acceptance Testing, Performance Testing, Load Testing, Stress Testing, Security Testing, Usability Testing, Regression Testing, Smoke Testing, and Compatibility Testing.
Incorporating integration tests with mocked external dependencies in a Continuous Integration (CI) pipeline is essential. Those tests are also focused on the interactions between your application and the external systems.
A stable and predictable environment is created on your own machine and pipeline, as they remove the risk of external service outages or changes affecting the test results. You can debug and recreate problems more easily.
The key objective of testing is to ensure the delivery of quality on all different kind of aspects. However, by employing Test-Driven Development (TDD) and utilizing representative, non-trivial data, developers gain a clearer understanding of the business and the code’s functionality.
To WireMock or not to WireMock, that is the question
To mock out an OpenID Connect provider, we need to simulate the behavior of the provider’s endpoints that are involved: JSON Web Key Set (JWKS) endpoint /jwks and the OpenID Connect discovery endpoint /.well-known/openid-configuration. The description of these endpoints is found in another paragraph below.
For validating /weatherforecast endpoint, there should be an algorithm to generate valid and invalid JWT’s. Those generated tokens will be used in the request. Finally, the resource server validates the request.
There are multiple strategies to mock endpoints:
- Using a library like WireMock.NET allows us to create stubs for HTTP requests and responses easily. By creating JSON documents that mimic the responses of a real
OpenID Connectprovider, we can define the mock endpoints’ expected behavior. XPRT Magazine issue 13 discussed WireMock.NET and its setup. However, WireMock.Net does not help in providing valid and invalid JWTs; it specializes in mocking HTTP dependencies. - Another solution involves manipulating the ConfigurationManager of the
OpenID Connectsettings and using a custom HttpClientHandler.
In both cases, these solutions intercept the HTTP requests to these endpoints and return pre-defined JSON documents as responses.
For this article, the ConfigurationManager is manipulated by providing a concise, straightforward solution. To maintain focus on creating tests, setting up the web application with policies, and preparing the necessary boilerplate without third-party libraries, we avoid adding complexity and extra dimensions.
Source code
This article includes code snippets and diagrams to provide readers with a clear overview. I encourage you to experiment with the code. You can find the source code at the following location: https://github.com/kriebb/MockOpenIdConnectIdpAspnetcore.
JWT tokens
The OpenID Connect protocols leans on the OAuth2 protocol. The authentication and authorization mechanism they provide makes use of JWT. So what is a JWT (JSON Web Token)?
A JWT Token is a compact and self-contained way of transmitting information between two parties in a secure manner.
A JWT token consists of three parts, separated by dots: a header, a payload, and a signature. The header contains information about the type of token and the algorithm used to sign it. The payload contains the information that needs to be transmitted, such as user ID or permissions. The signature is used to verify that the token has not been tampered with during transmission.
Here is an example, decoded by https://jwt.io
eyJhbGciOiJIUzI1NiIsInR5cCI6IkpXVCJ9.eyJzdWIiOiIxMjM0NTY3ODkwIiwibmFtZSI6IkpvaG4gRG9lIiwiaWF0IjoxNTE2MjM5MDIyfQ.SflKxwRJSMeKKF2QT4fwpMeJf36POk6yJV_adQssw5c
header:
{
"alg": "HS256",
"typ": "JWT"
}
body:
{
"sub": "1234567890",
"name": "John Doe",
"iat": 1516239022
}
The algorithm used to sign the JWT token is specified in the header. There are several algorithms that can be used, such as HS256, RS256 and others… RS256 stands for RSA-SHA256, which is an asymmetric encryption algorithm that uses a public key for encryption and a private key for decryption.
The public keys to validate JWT’s are provided by the OpenID Connect Provider. The resource server should be able to access the public keys so the JWT’s can be validated.
Why is a Private Key of a certificate called private?
In this article, we will generate a self-signed certificate to help us generate valid and invalid JWT. It is crucial to remember that in production and testing environments, OpenID Connect IdP Providers’ certificates should be kept confidential and not exposed. Additionally, there should be a mechanism in place to refresh the certificates periodically.
Attackers can impersonate the IdP (Identity Provider) by using the leaked certificate to sign tokens or establish secure connections. That can lead to manipulation of the communication between the parties involved and unauthorized access to sensitive resources or user data: user credentials, personal information.
With access to the private key, attackers can create forged tokens that appear valid to the client applications and resource servers. This can grant them unauthorized access to protected resources or enable them to perform actions on behalf of legitimate users.
About the OpenID Connect Flows
Let us discuss two standard flows: the Authorization Code Flow and the Client Credential flow.
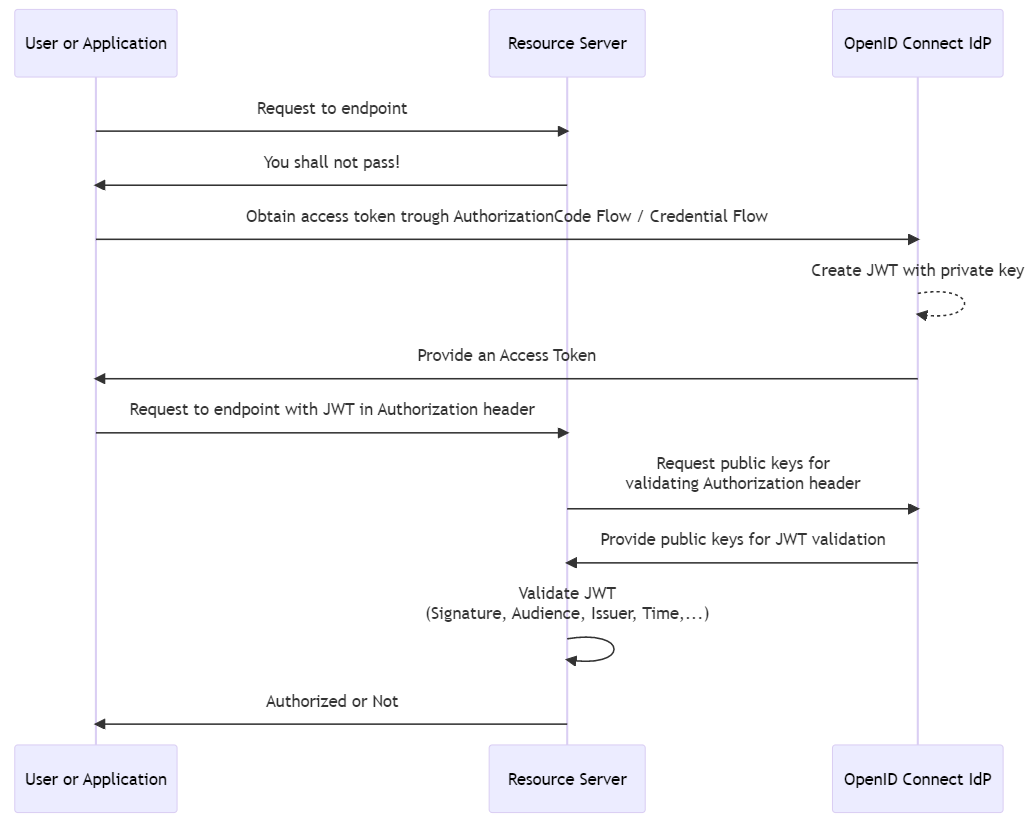
The Authorization Code Flow will require user input to obtain the access token. To get an access token between two services without user input you can use the Credential flow. Those steps do not involve the resource server you build. The resource server can ask the OpenID Connect for additional information for validating the Authorization header. The OpenID Connect Idp has created the JWT with its private key. To validate that JWT, the Idp provides access to the corresponding public key.
OpenID Configuration Discovery
OpenID Connect supports the discovery of the needed endpoints used for all the needed steps. We are interested in two endpoints. One is for listing all the endpoint configurations and one is for validating the signature of the access token:
- The /.well-known/openid-configuration endpoint, which returns a JSON document containing metadata about the provider’s configuration, such as the authorization and token endpoints, supported grant types, and public keys for validating tokens. One of the endpoints listed in this configuration is the location of the /jwks endpoint.
- The /jwks endpoint, which returns a JSON document containing the provider’s public keys in JSON Web Key (JWK) format, which can be used to validate the signature of the access tokens.
By mocking out these endpoints, we can simulate the behavior of a real OpenID Connect provider without having to set up and configure one.
Authentication and Authorization
When an HTTP request arrives with an authorization header, the authentication process checks the validity of the header, typically by verifying a JSON Web Token (JWT) if present. Once the authentication succeeds, the authorization process begins to evaluate whether the request is allowed to access a specific endpoint. If the authentication check fails, the response has HTTP status code 401 (Unauthorized). If the authorization check fails, the server responds with an HTTP status code 403 (Forbidden).

How are the tests setup?
Before some code is shown, let us introduce the classes, the responsibilities of those classes and the interaction between them. This should help to understand the code shown in the section below called Boilerplate.
First, we define a couple of tests which are the requirements to help us ensure OpenID Connect Configuration and middleware are functioning together. They need to be simple, show intent and be explicit about it. All those tests follow the Arrange-Act-Assert (AAA)-syntax. To ensure the tests have access to a customizable JWT, a self-signed certificate will be created. That certificate will give those tests the possibility to:
- sign the JWT using the certificate private key.
- provide resource server access to the certificate public key using the /jwkset endpoint.
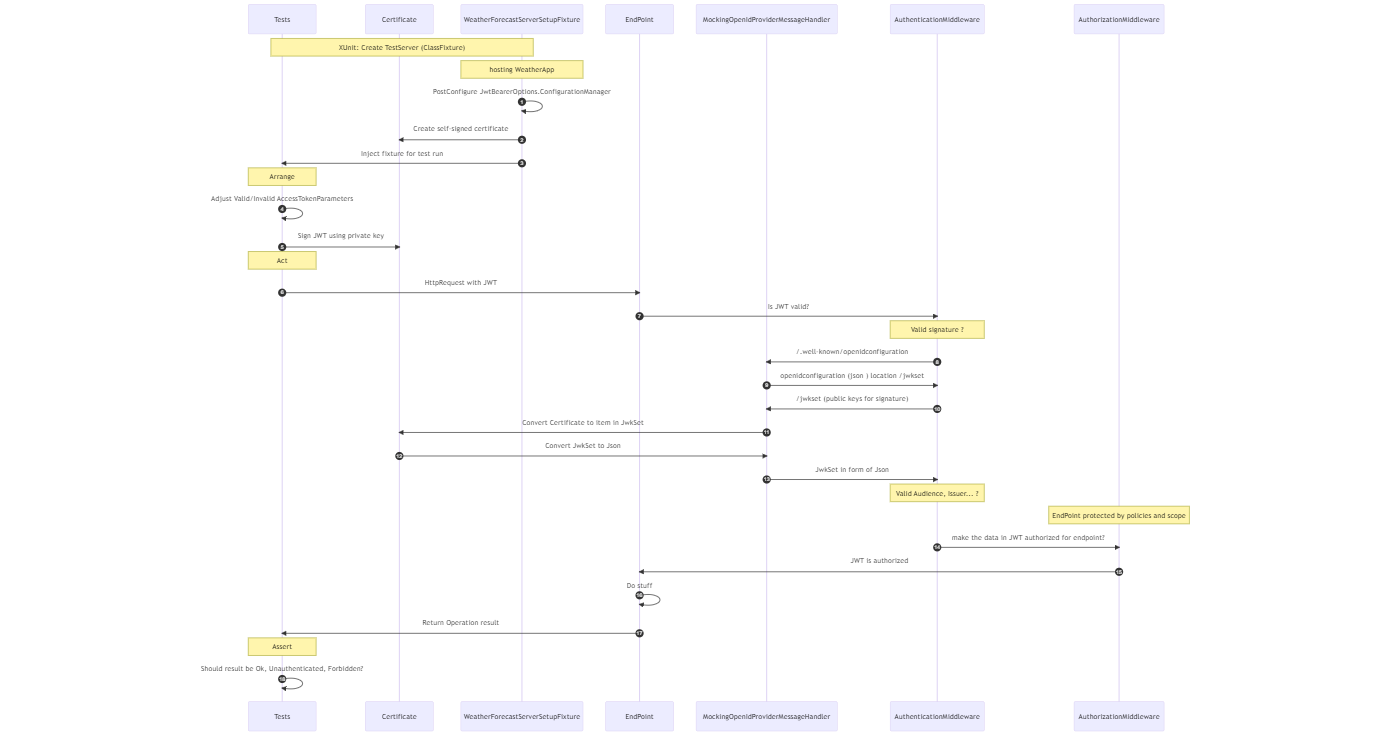
The tests-class implement IClassfixture<WeatherForecastServerSetupFixture>. The classfixture represents the test server that will be created by XUnit. That will host what is defined in the WeatherApp application, i.e., what is defined in Program.cs
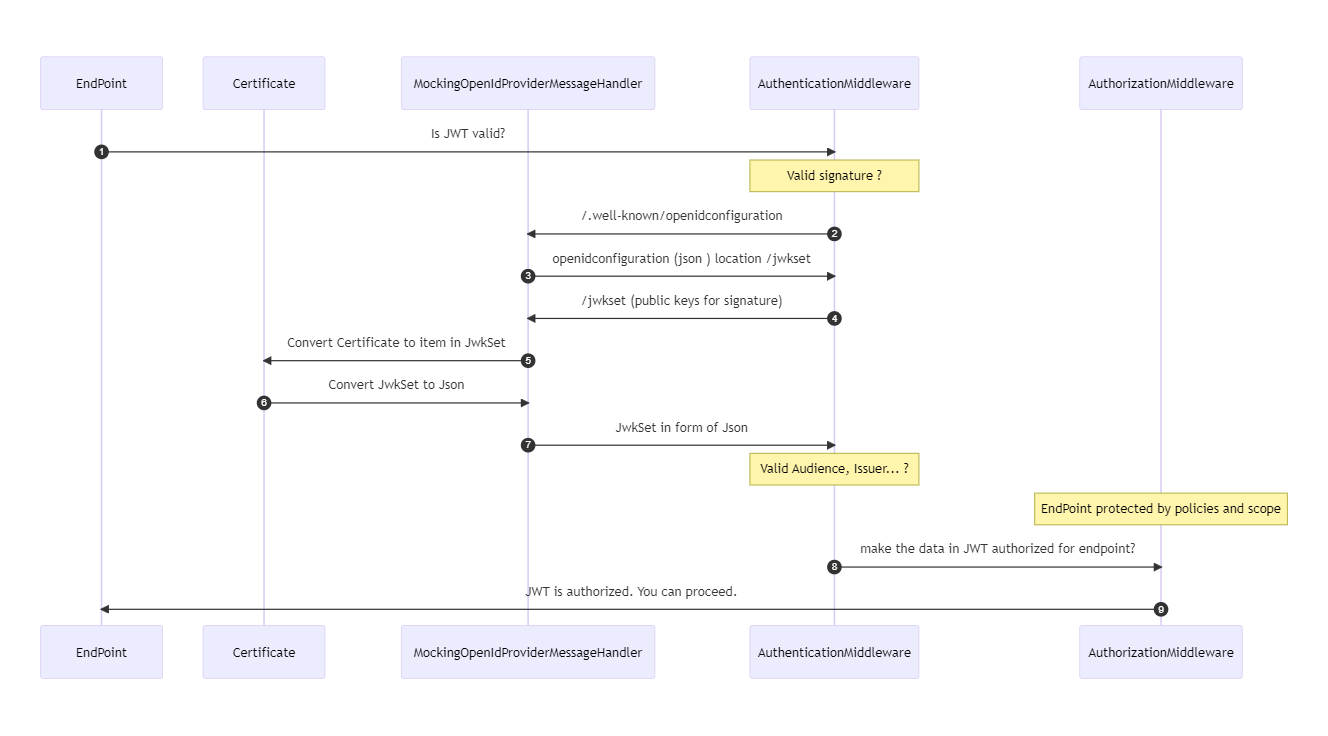
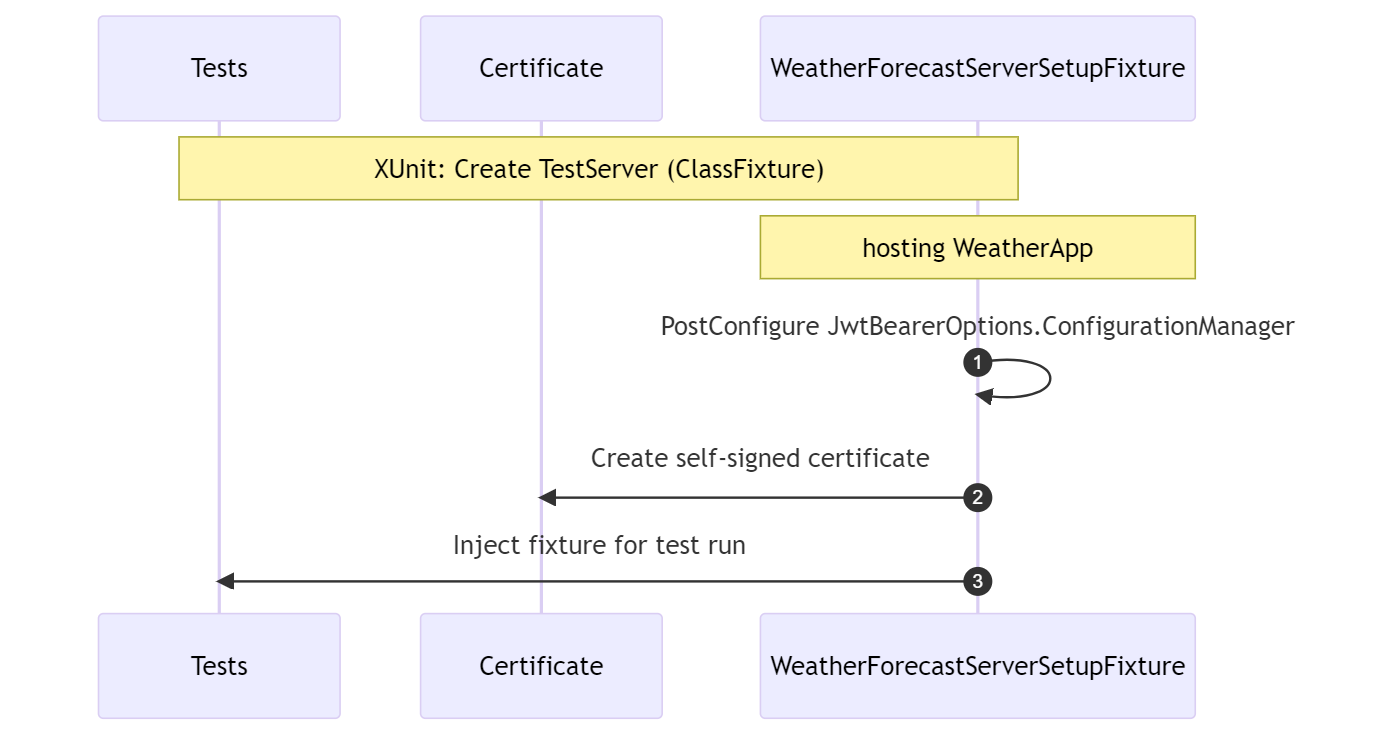 The application that is under test is a sample application called WeatherApp. That application has one endpoint defined called /weatherforecast. The authentication middleware validates there is a JWT. The JWT should contain a valid audience, issuer, and signature. After the token is validated, the authorization middleware kicks in. The JWT is checked to see if it contains data that authorized the request to access the endpoint. The endpoint is protected by two policies. To have a successful HTTP GET Operation, there needs to be a claim with the name country and value Belgium and a scope that should contain “WeatherForecast:Get”.
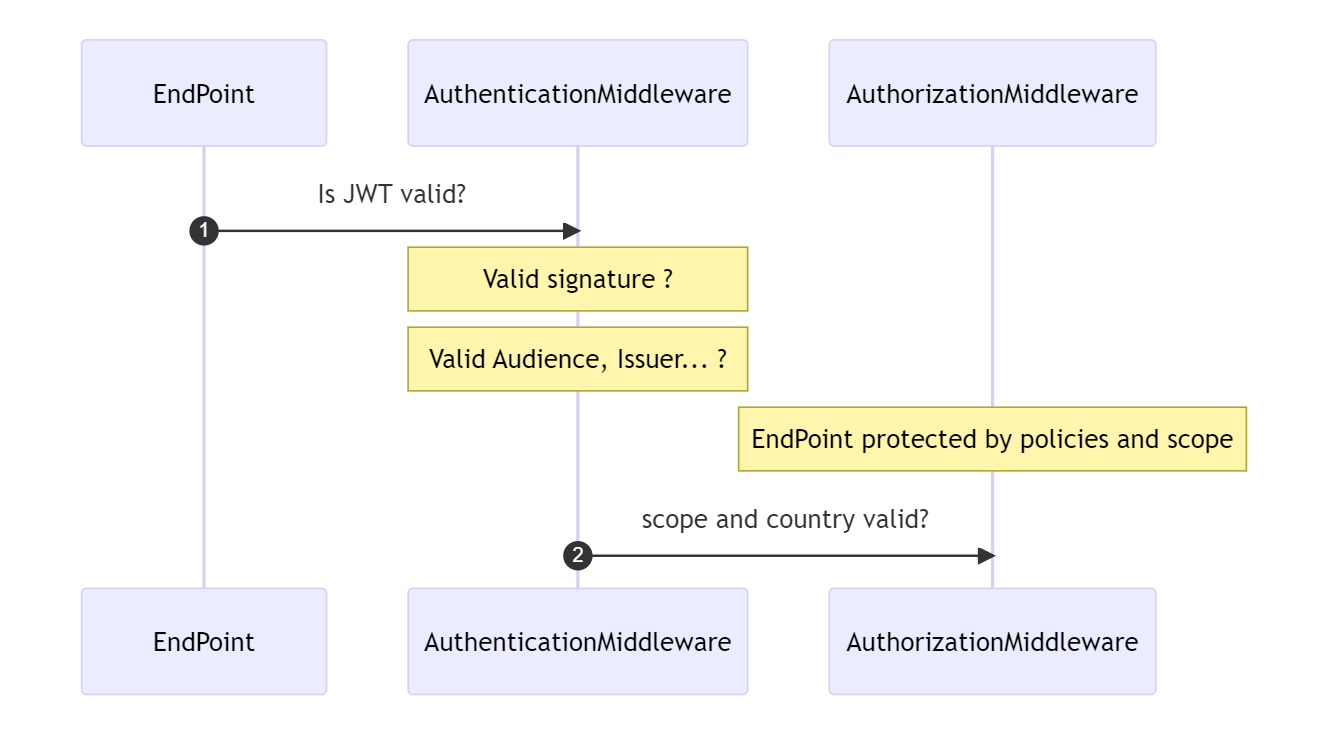 In the class fixture we will set the JwtBearerOptions.ConfigurationManager. That happens by using the ServiceCollection.PostConfigure<JwtBearerOptions> method. By post-configuring the options, the instantiation of the ConfigurationManager is influenced. A HttpClient that relies on a custom class MockingOpenIdProviderMessageHandler is injected.
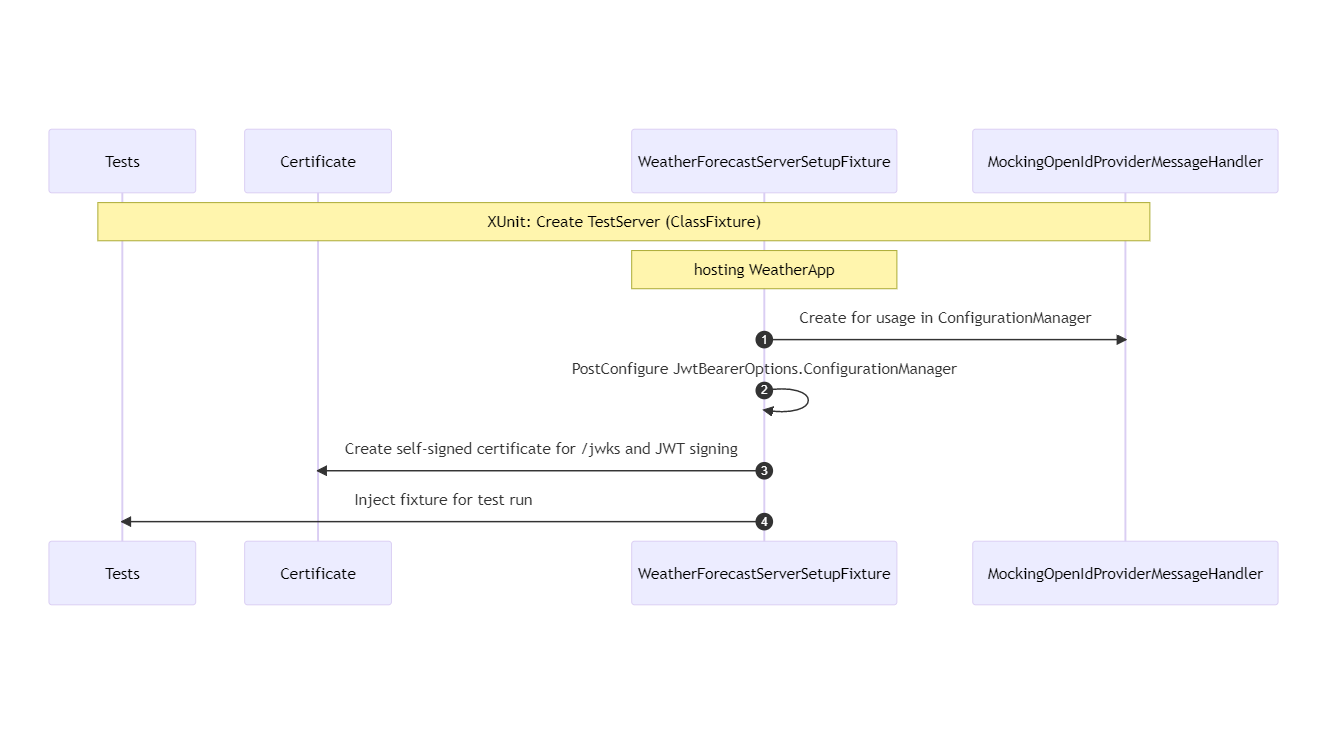
It is the responsibility of the class MockingOpenIdProviderMessageHandler to intercept the retrieval of the OpenID Connect configuration. By using a custom OpenID Connect Configuration object, the location of the /jwks endpoint is manipulated. The call made to the /jwks endpoint is intercepted. When the location of the public keys’ endpoint is called, the messagehandler replies with our own JwkSet, based on our self-signed certificate. That certificate is also used for the signing of the JWT. Because it is using the private key of the certificate that has signed the JWT, the certificate’s public key will generate a valid signature.
Setting up tests
Next, we will describe a series of tests to validate the behavior of an application’s /WeatherForecast endpoint when handling different authentication scenarios. The tests cover cases with no authorization header, a valid JSON Web Token (JWT), an invalid issuer and an invalid claim for the country. Each test has a diagram that illustrates the flow of interactions between the components involved in each test, providing a clear understanding of the expected outcomes.
A test without an authorization header should return with a http status code Unauthorized
The first test is the easiest one. A default http client is created. A request is made to the /WeatherForecast endpoint. The endpoint should respond with unauthorized.
var httpClient = _fixture.CreateDefaultClient();

var response = await httpClient.GetAsync("WeatherForecast");

response.StatusCode.ShouldBe(HttpStatusCode.Unauthorized);

A test with a valid JWT in the authorization header should return with a http status code OK
The code below has the same structure as the previous test, but with a difference: a default instance of the AccessTokenParameters. The default instance of AccessTokenParameters contains all the valid information needed to generate a valid JWT. That instance is passed to the JwtBearerCustomAccessTokenHandler. JwtBearerCustomAccessTokenHandler will generate the access token and add the Authorization header with the access token to the request.
var accessTokenParameters = new AccessTokenParameters();

var httpClient = _fixture.CreateDefaultClient(new JwtBearerCustomAccessTokenHandler(accessTokenParameters));

var response = await httpClient.GetAsync($"/WeatherForecast/");

response.StatusCode.ShouldBe(HttpStatusCode.OK);
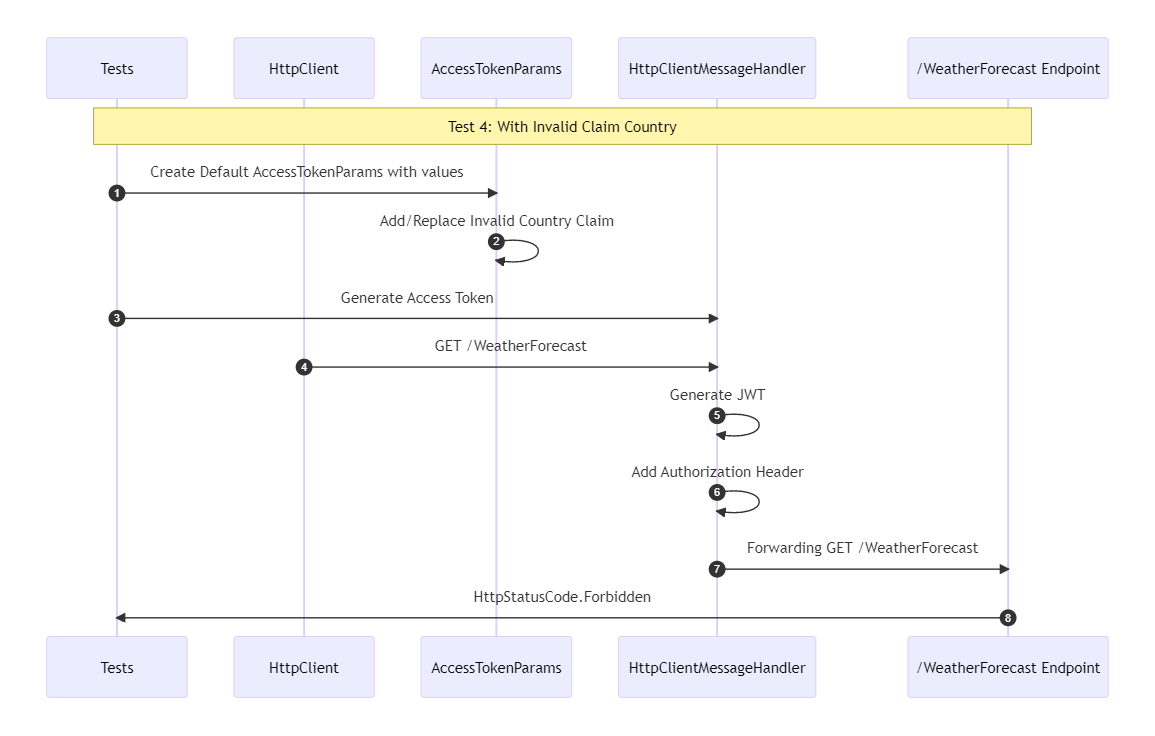
In the diagram below, you will notice the term HttpClientMessageHandler. That is a generalized name. This is the class JwtBearerCustomAccessTokenHandler. I used that term to stress that it is the HttpClient that uses a delegate that manipulates the HttpRequest before sending it.

A test with an invalid issuer should return with a http status code Unauthorized
The code below has the same structure as the valid test. A default instance of the AccessTokenParameters with an invalid issuer is passed to the JwtBearerCustomAccessTokenHandler.
var accessTokenParameters = new AccessTokenParameters()

{ Issuer = "InvalidIssuer" };

var httpClient = _fixture.CreateDefaultClient(new JwtBearerCustomAccessTokenHandler(accessTokenParameters));

var response = await httpClient.GetAsync($"/WeatherForecast/");

response.StatusCode.ShouldBe(HttpStatusCode.Unauthorized);

A test with an invalid claim country should return with a http status code Forbidden
The same structure applies to this test as well. The difference now is that a method is used to replace the valid value of the claim "country” with an invalid value.
var accessTokenParameters = new AccessTokenParameters();

accessTokenParameters.AddOrReplaceClaim("country", "invalidCountry");

var httpClient = _fixture.CreateDefaultClient(new JwtBearerCustomAccessTokenHandler(accessTokenParameters, _testOutputHelper));

var response = await httpClient.GetAsync($"/WeatherForecast/");

response.StatusCode.ShouldBe(HttpStatusCode.Forbidden);
Setting up the Web Application
To secure WeatherForecastController, the authorize attribute is added at the class-level. That will tell the authentication middleware to protect all the endpoints inside that controller. Additionally, the authentication middleware needs to validate the JWT bearer when it detects an Authorization header according to the specified settings. There is a policy defined in the authorize attribute. The specified policies need to be added when you configure the authorization middleware.
WeatherForecastController
To protect the endpoints of the WeatherForecastController, define two policies:
- all the controllers’ endpoints can only be accessed from Belgium.
- the access token needs to define specific access to the GET /weatherforecast operation.
[Authorize(Policy = "OnlyBelgiumPolicy")]

public class WeatherForecastController : ControllerBase {

[HttpGet()]

[Authorize(Policy = "WeatherForecast:Get")]

public WeatherForecast Get() {
Program
This section covers the creation of the web application, the configuration of the authentication and authorization middleware, and the ordering of their execution.
- Create the builder for the WebApplication
var builder = WebApplication.CreateBuilder(args);- Add the authentication middleware and configure with the help of the JwtBearerDefaults class. On the authentication middleware, configure the middleware so that it supports validation for JWT bearer tokens. In the section “.AddJwtBearer” there are a lot of options. For this article’s purposes, we limit the options to what the middleware should do with claims and what of the JWT should be validated.
builder.Services.AddAuthentication(options =>

{

    options.DefaultAuthenticateScheme = JwtBearerDefaults.AuthenticationScheme;

    options.DefaultChallengeScheme = JwtBearerDefaults.AuthenticationScheme;

    options.DefaultScheme = JwtBearerDefaults.AuthenticationScheme;

}).AddJwtBearer(o =>

{

    o.MapInboundClaims = false;

    o.TokenValidationParameters = new TokenValidationParameters

    {

        ValidIssuer = builder.Configuration["Jwt:Issuer"],

        ValidAudience = builder.Configuration["Jwt:Audience"],

        ValidateIssuer = true,

        ValidateAudience = true,

        ValidateLifetime = true,

        ValidateIssuerSigningKey = true,

        NameClaimType = "sub",

    };

});- The authorized attributes in the controller class refer to certain policies. Those policies need to be configured on the authorization middleware. The policies OnlyBelgiumPolicy and WeatherForecast:Get are defined by searching the JWT for the respective claims country and scope. They should have the value Belgium and weatherforecast:read.
builder.Services.AddAuthorization(authorizationOptions => {

    authorizationOptions.AddPolicy("OnlyBelgiumPolicy", policy => policy.RequireClaim("country", "Belgium"));

    authorizationOptions.AddPolicy("WeatherForecast:Get", policy => policy.RequireClaim("scope", "weatherforecast:read"));

});- After the middleware is defined, it is time to build the WebApplication. From there you tell the web application to use the configured middleware. The order is important: the sequence of the Use***-methods is the sequence that the middleware will be triggered. Having the authorization middleware before the authentication middleware makes no sense.
var app = builder.Build();

…

app.UseRouting()

   .UseAuthentication()

   .UseAuthorization()

   .UseEndpoints(endpoints => { endpoints.MapControllers();});
Boilerplate
Below you will find a summary of the boilerplate code that is needed.
- Creating a self-signed certificate
- The conversion of the public key to a JWKSet
- Setting up the classfixture
- Configure the ConfigurationManager
- Mock endpoints by using a mocked HttpMessageHandler in a preconfigured HttpClient.
Self-signed certificate
The identity provider has been configured to sign the JWT using RS256. Below you will find a method to mimic that.
The class SelfSignedAccessTokenPemCertificateFactory provides the functionality to create an object of the type PemCertificate. The instance will contain the certificate, public key and private key.
The certificate will have the following properties:
- a 2048 bit Key size,
- valid for 10 years,
- Ensure the certificate can be used for code signing (OID 1.3.6.1.5.5.7.3.3)
- a start date defines as the day before today
- bound to the domain i.do.not.exist.
using (RSA rsa = RSA.Create()){

    rsa.KeySize = 2048;

    var request = new CertificateRequest("cn=i.do.not.exist", rsa, HashAlgorithmName.SHA256,RSASignaturePadding.Pkcs1);

    request.CertificateExtensions.Add(

        new X509BasicConstraintsExtension(true, false, 0, true));

    request.CertificateExtensions.Add(

        new X509EnhancedKeyUsageExtension(new OidCollection

        {

            new Oid("1.3.6.1.5.5.7.3.1")

        }, false));

    var yesterday = new DateTimeOffset(DateTime.UtcNow.AddDays(-1));

    var tenyearslater = new DateTimeOffset (DateTime.UtcNow.AddDays(3650));

    X509Certificate2 cert = request.CreateSelfSigned(yesterday,tenyearslater));

    var certificatePem = PemEncoding.Write("CERTIFICATE", cert.RawData);

    AsymmetricAlgorithm? key = cert.GetRSAPrivateKey();

    byte[] pubKeyBytes = key.ExportSubjectPublicKeyInfo();

    byte[] privKeyBytes = key.ExportPkcs8PrivateKey();

    char[] pubKeyPem = PemEncoding.Write("PUBLIC KEY", pubKeyBytes);

    char[] privKeyPem = PemEncoding.Write("PRIVATE KEY", privKeyBytes);

    var pemCertificate = new PemCertificate(

        Certificate: new string(certificatePem),

        PublicKey: new string(pubKeyPem),

        PrivateKey: new string(privKeyPem)

    );

    return pemCertificate;

}
There are a lot of possibilities to play around with the settings of the self-signed certificate and thus validate your security setup.
Create an object of the type JsonWebKeySet
When there is a certificate in a PEM format, a JWKSet can be created from it. The /jwks endpoint expects it in that format. There is a method on the class PemCertificate called ToJwksCertificate. The property PublicKey of the certificate offers a possibility to export the parameters needed to create a JsonWebKey. That instance is added to the Keys property of the class JsonWebKeySet.
var certificate = X509Certificate2.CreateFromPem(CertInPEMString);

var keyParameters = certificate.PublicKey.GetRSAPublicKey()?.ExportParameters(false);

var e = Base64UrlEncoder.Encode(keyParameters.Value.Exponent);

var n = Base64UrlEncoder.Encode(keyParameters.Value.Modulus);

var dict = new Dictionary<string, string>()

{

    { "e", e },

    { "kty", "RSA" },

    { "n", n }

};

var hash = SHA256.Create();

var asciiBytes = ASCII.GetBytes(JsonConvert.SerializeObject(dict))

var hashBytes = hash.ComputeHash(asciiBytes);

JsonWebKey jsonWebKey = new JsonWebKey()

{

    Kid = Base64UrlEncoder.Encode(hashBytes),

    Kty = "RSA",

    E = e,

    N = n

};

JsonWebKeySet jsonWebKeySet = new JsonWebKeySet();

jsonWebKeySet.Keys.Add(jsonWebKey);

return jsonWebKeySet;
Setting the classfixture
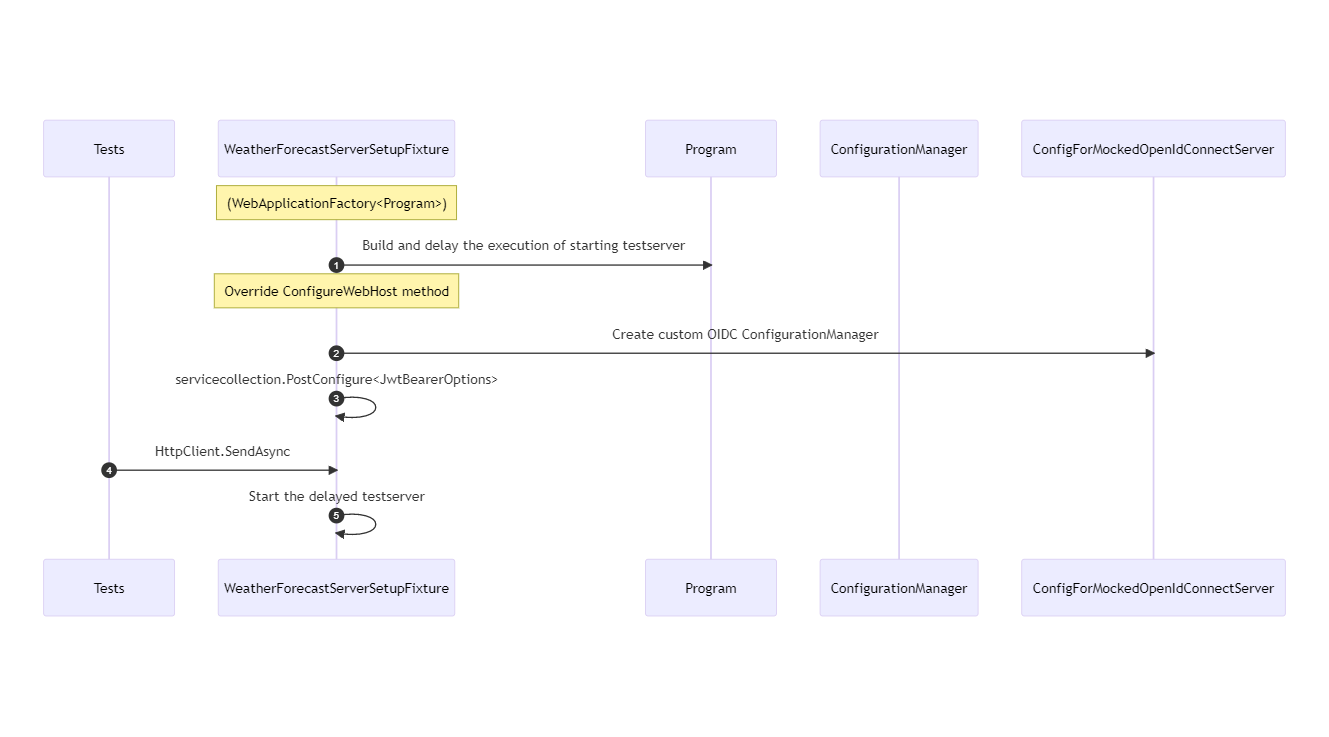
To create system tests, we need to setup the server that gives us our endpoint /WeatherForecast. That happens in a class fixture named WeatherForecastServerSetupFixture.
public class WeatherForecastServerSetupFixture: WebApplicationFactory<Program>The WebApplicationFactory will use the class Program to build and delay the start of the test server, but only after adding, applying and/or overriding settings and services that have been set in the Program. The TestServer will start when it is needed, in this case when the HttpClient will send a message.
The WebApplicationFactory class offers several methods that you can override. Override the method ConfigureWebHost in the class fixture WeatherForecastServerSetupFixture. The ConfigurationManager is a property on the OpenID Connect settings.
In the method ConfigureWebHost, we post-configure JwtBearerOptions with a predefined ConfigurationManager made by ConfigForMockedOpenIdConnectServer.
builder.ConfigureTestServices(services =>  {

services.PostConfigure<JwtBearerOptions>(

JwtBearerDefaults.AuthenticationScheme,

options => {

options.ConfigurationManager = ConfigForMockedOpenIdConnectServer.Create();
The ConfigurationManager is built with a preconfigured HttpClient in the class ConfigForMockedOpenIdConnectServer. The interception of the request will happen in the class MockingOpenIdProviderMessageHandler.
MockingOpenIdProviderMessageHandler
The constructor of the class MockingOpenIdProviderMessageHandler has two parameters. Two constants are used:
- Consts.ValidSigningCertificate: contains the certificate to generate the public key when a request is sent to the the /jwks endpoint.
- Consts.ValidOpenIdConnectDiscoveryDocumentConfiguration: contains OpenID Connect Settings with predefined values.
The requests the authentication middleware makes will be handled by MockingOpenIdProviderMessageHandler. By overriding the SendAsync method, the OpenID Connect settings and public keys are returned when requested.
if (request.RequestUri.AbsoluteUri.Contains(Consts.WellKnownOpenIdConfiguration))return await GetOpenIdConfigurationHttpResponseMessage();

if (request.RequestUri.AbsoluteUri.Equals(_openIdConnectDiscoveryDocumentConfiguration.JwksUri))return await GetJwksHttpResonseMessage();
The response of the OpenID Connect Discovery request will contain settings copied from the real Idp provider you use, with some minor changes, e.g., the location of the /jwks endpoint. The /jwks endpoint contains generated public keys from our self-signed certificate. Later that same self-signed certificate will be used to generate signatures of the JWT.
IConfigurationManager<OpenIdConnectConfiguration>
All the building blocks are now in place to create the ConfigurationManager<OpenIdConnectConfiguration>.
The following parameters are required to create the instance:
- Consts.WellKnownOpenIdConfiguration : a valid URL of the fake Idp Provider
- OpenIdConnectConfigurationRetriever: retrieves the OpenID Connect config
- HttpDocumentRetriever: the instance that the OpenIdConnectConfigurationRetriever uses to fetch the config. It uses an instance of a HttpClient configured with the MockingOpenIdProviderMessageHandler.
The above translate to the code below.
var handler = new MockingOpenIdProviderMessageHandler(Consts.ValidOpenIdConnectDiscoveryDocumentConfiguration, Consts.ValidSigningCertificate);

var openIdHttpClient = new HttpClient(handler);

var httpDocumentRetriever = new HttpDocumentRetriever(openIdHttpClient);

var openIdConnectConfigRetriever = new OpenIdConnectConfigurationRetriever();

return new ConfigurationManager<OpenIdConnectConfiguration>(

Consts.WellKnownOpenIdConfiguration,

openIdConnectConfigRetriever,

httpDocumentRetriever);
Generating an access token
The code below shows how to generate a JWT using a X509Certificate2.
In this code snippet, we demonstrate how to create an encoded access token using a valid signing certificate. First, we convert the certificate to an X509Certificate2 object. Next, we create signing credentials using the certificate and the RSA-SHA256 algorithm. We then define a ClaimsIdentity object and set up a SecurityTokenDescriptor with the necessary information such as the audience, issuer, expiration time, and signing credentials. Finally, we use the JwtSecurityTokenHandler to create and write the token, resulting in an encoded access token.
var cert = Consts.ValidSigningCertificate.ToX509Certificate2()

var signingCredentials = new SigningCredentials(new X509SecurityKey(cert), SecurityAlgorithms.RsaSha256);

var identity = new ClaimsIdentity(Consts.Claims);

var securityTokenDescriptor = new SecurityTokenDescriptor {

Audience = Consts.Audience,

Issuer = Consts.Issuer,

NotBefore = DateTime.UtcNow,

Expires = DateTime.UtcNow.AddHours(1),

SigningCredentials = signingCredentials,

Subject = identity };

var handler = new JwtSecurityTokenHandler();

var securityToken = handler.CreateToken(securityTokenDescriptor);

var encodedAccessToken = handler.WriteToken(securityToken);
When generating the /jwks endpoint, the Consts.ValidSigningCertificate was used. The authentication middleware requires a valid signature. The PemCertificate object that contains the Certificate, PrivateKey and PublicKey properties is converted into a X509Certificate2.
X509Certificate2.CreateFromPem(Certificate, PrivateKey);Setting invalid audience, issuer and subject or having a wrong certificate should be used in tests to ensure an unauthenticated or unauthorized error is the expected result.
Adding the access token to the request
There are multiple ways to add an access token to a request. The WebApplicationFactory class offers a CreateDefaultClient method, which creates a HTTP Client for you. What that method does is create a HTTP client. It sets the URL of the test server. When using that method, there is an optional parameter where you can pass a DelegatingHandler. JwtBearerCustomAccessTokenHandler is a custom class that extends from that DelagatingHandler and overrides the Send method it offers.
var encodedAccessToken = JwtBearerAccessTokenFactory.Create(_accessTokenParameters);

request.Headers.Authorization = new AuthenticationHeaderValue("Bearer", encodedAccessToken);

return base.Send(request, cancellationToken);
When the HttpClient sends the request, JwtBearerCustomAccessTokenHandler will execute the Send method and thus add the access token to the AuthorizationHeader.
The JwtBearerAccessTokenFactory.Create will create the access token
Summary
This article touches on various concepts and techniques, such as creating self-signed certificates, generating JWK sets on the fly and managing access tokens. I encourage you to try out these snippets or visit GitHub for the entire codebase. It can be a step towards gaining a deeper understanding of OpenID Connect and its integration into applications. That alone will help improve application security and performance.
By having another tool in your toolbox, you can create a robust testing environment. That allows you to test different scenarios in an automated manner. Those tests will include testing of valid and invalid access tokens. It ensures that applications handle authentication and authorization correctly. All with realistic configuration and without mocked classes.
With packages as a big black box, it is not always easy to understand what is happening behind the scenes.
You should now have a better understanding of setting up a test server, which can be useful in other projects or testing scenarios.

Sources
- Create a Controller-based API: WeatherForecast sample: https://learn.microsoft.com/en-us/aspnet/core/web-api/?view=aspnetcore-6.0
- Insight in OpenID Connect endpoints: https://openid.net/specs/openid-connect-discovery-1_0.html
- More information about access tokens: https://oauth.net/specs/
- JWK / JWT / Certificate relationship: https://dirkbolte.medium.com/the-token-connection-61e22ff54fe0
- JWK: https://openid.net/specs/draft-jones-json-web-key-03.html
- JWT:
- Information about self-signed certificates:
- https://dotnetcoretutorials.com/2020/11/18/generating-self-signed-certificates-for-unit-testing-in-c/
- https://oidref.com/1.3.6.1.5.5.7.3.3
- Generating a self-signed certificate using Dotnet 6 standard libraries: https://chat.openai.com/chat
- How to setup your integrationtests:

