
Uncategorized
Asynchronous workflow pattern 
edudojevic@xebia.com 15 Apr, 2019


What is the best git workflow for DevOps teams? The most popular workflow for git is still git-flow. I did a poll on Twitch with a friend some time ago and still over 50% of the audience said they were using it. And this is strange, because even Vincent Driessen, the author of the original post about git-flow, wrote a note in March 2020 in the post that git-flow is not the best workflow for cloud services, apps, or web applications. So why is it still so popular? I think there are three reasons:
And what’s the problem with GitHub Flow? Well, the name sounds too close to GitFlow and the description of the workflow is not very precise. How do you deploy? What do you do with long-lived feature branches? How can you support different versions for different customers?
I thinks what we need is a good new workflow with a good name and a nice chart! So let me introduce you to…
MyFlow is a lightweight, trunk-based workflow based on pull-requests. It is not a new invention! Many teams already work this way. It is a very natural way to branch and merge if you focus on collaboration with pull-request. I just try to give it a name and add some explanations for engineers that are new to git. Here is an overview: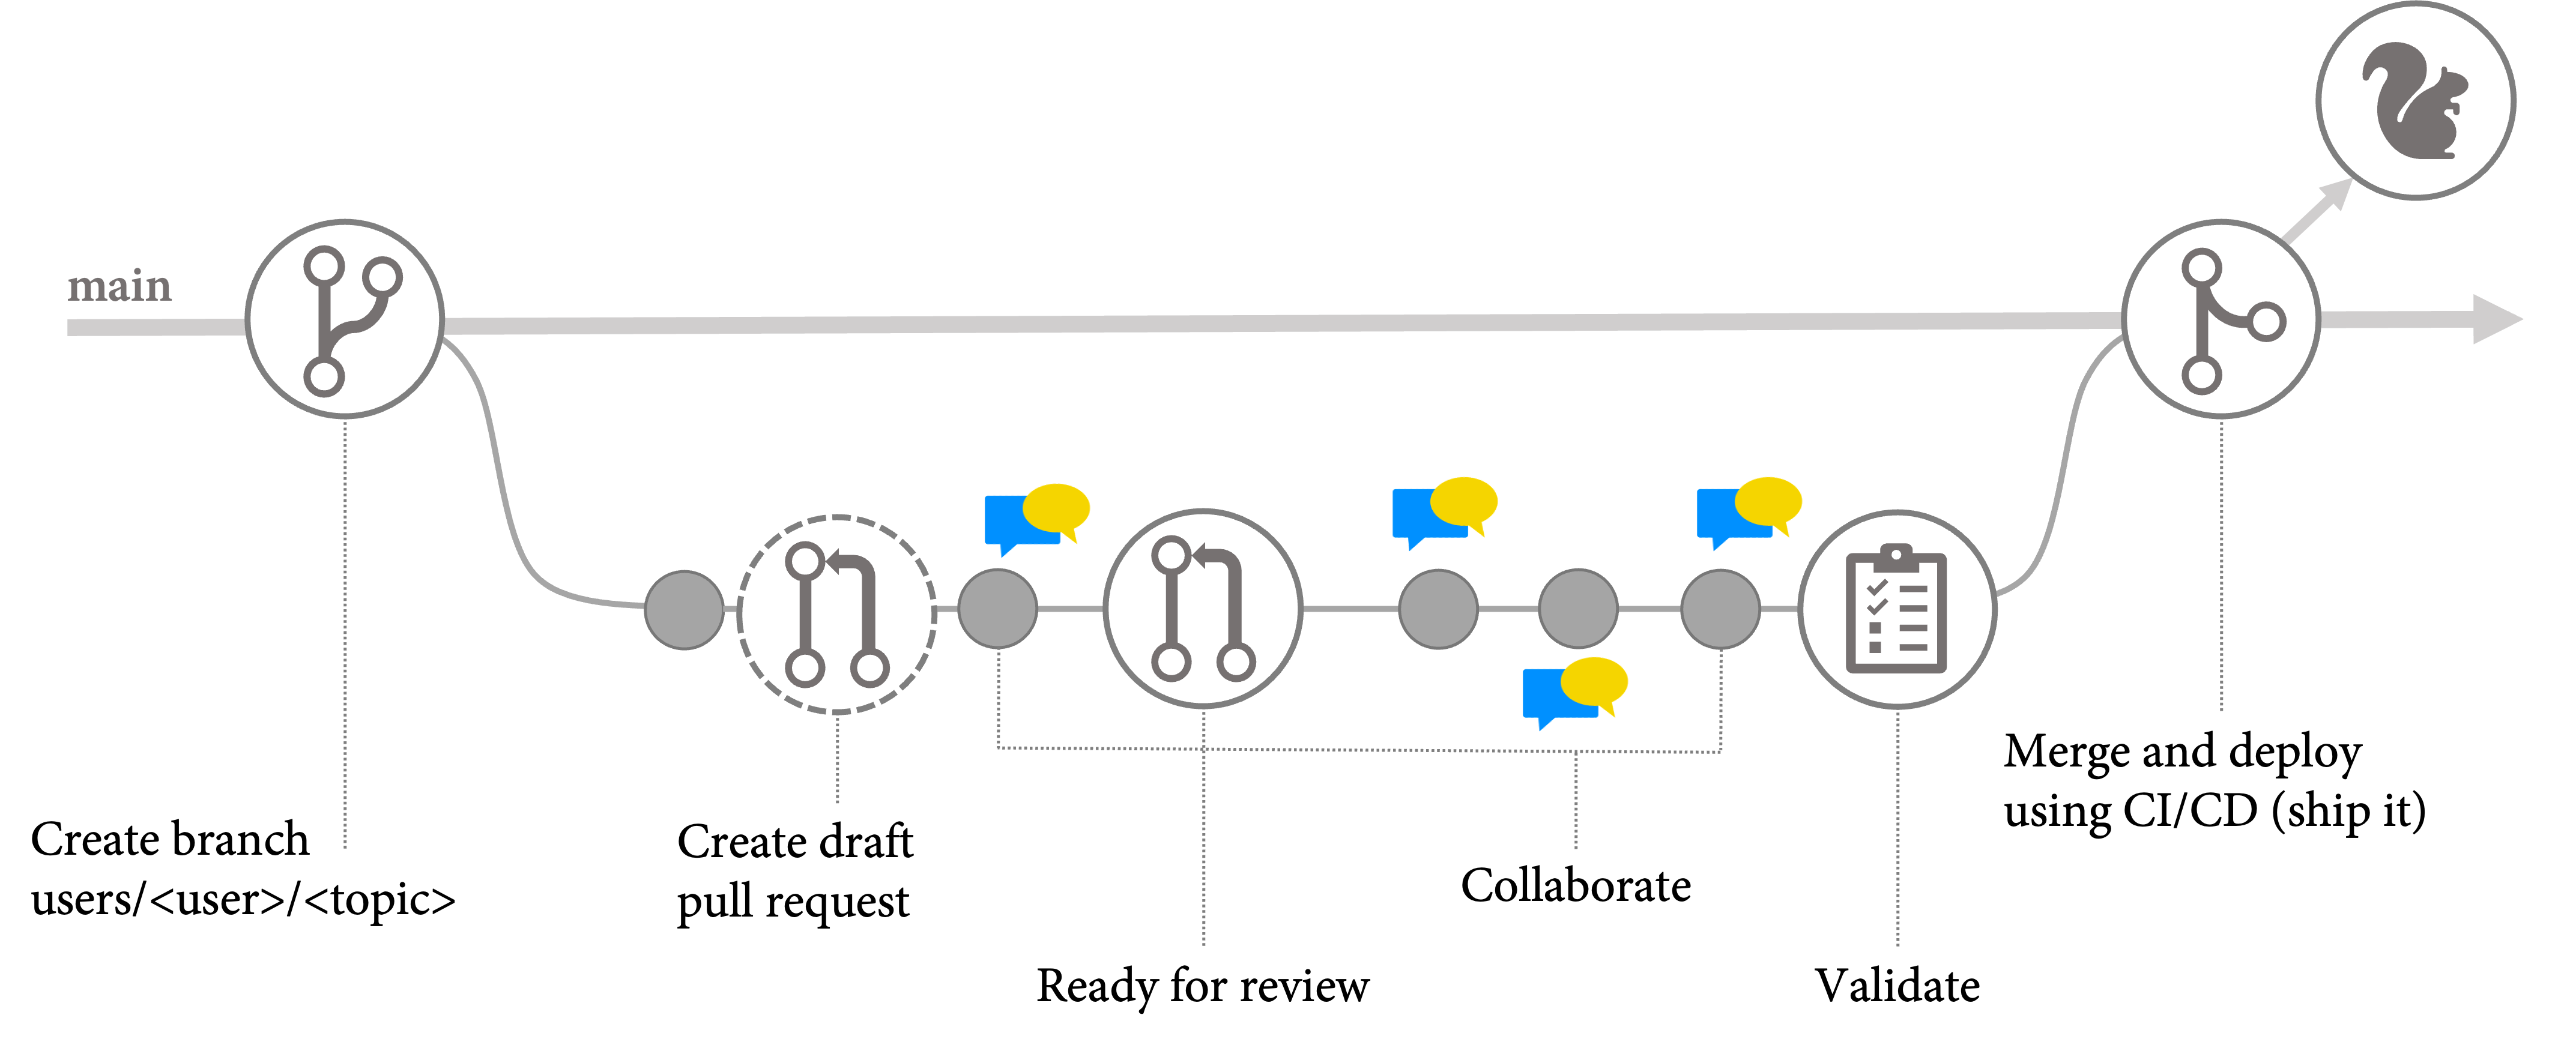
This is part 1 of a series of posts that describe MyFlow: a collection of best practices on how to set up a successful branching model for GitHub.
Part 1 will cover the main branch and how to work with private topic branches. In part 2 I’ll explain release branches and semantic versioning. In part 3 I’ll show you how you can automate parts of the flow using git aliases.
MyFlow is trunk-based – that means there is only one main branch called main. The main branch should always be in a clean state in which a new release can be created at any time. That’s why you should protect your main branch with a branch protection rule. A good branch protection rule would include:
The more you automate using the the workflow that is triggered by your pull request, the more likely it is that you can keep your branch in a clean state.
All other branches are always branched of main. Since this is your default branch, you never have to specify a source branch when you create new branches. This simplifies things and removes a source of error.
Private topic branches can be used to work on new features, documentation, bugs, infrastructure, and everything else that is in your repository. And, They are private – so they belong to one specific user. This mOther team members can check out the branch to test it – but they are not allowed to directly push changes to this branch. Instead they must use suggestions in pull requests to suggest changes to the author of the pull request.
To indicate that the branches are private, I recommend a naming convention like users/* or private/* that makes this obvious. Don’t use naming conventions like features/* – they imply that multiple developers may work on one feature. I also recommend including the id of the issue or bug in the name. This makes it easy to reference it later in the commit message. A good convention would be:
users/<username>/<id>_<topic>Private topic branches are low-complexity branches. If you work on a more complex feature, you should at least merge your changes back to main and delete the topic branch once a day using feature flags (aka feature toggles). If the changes are simple and can be easily rebased onto main, you can leave the branch open for a longer time. The branches are low-complexity and not short-lived.
So, to start working on a new topic you perform three steps:
To create a new branch locally you use git switch:
$ git switch -c <branch-name>For example:
$ git switch -c users/kaufm/42_my-new-feature main
> Switched to a new branch 'users/kaufm/42_my-new-feature'Create your first modifications and commit and push them to the server. It does not matter what you modify – you could just add a blank line to a file. You can overwrite the change later anyway. Add, commit, and push the change:
 $ git add .
 $ git commit
 $ git push --set-upstream origin <branch-name>
For example:
$ git add .
$ git commit
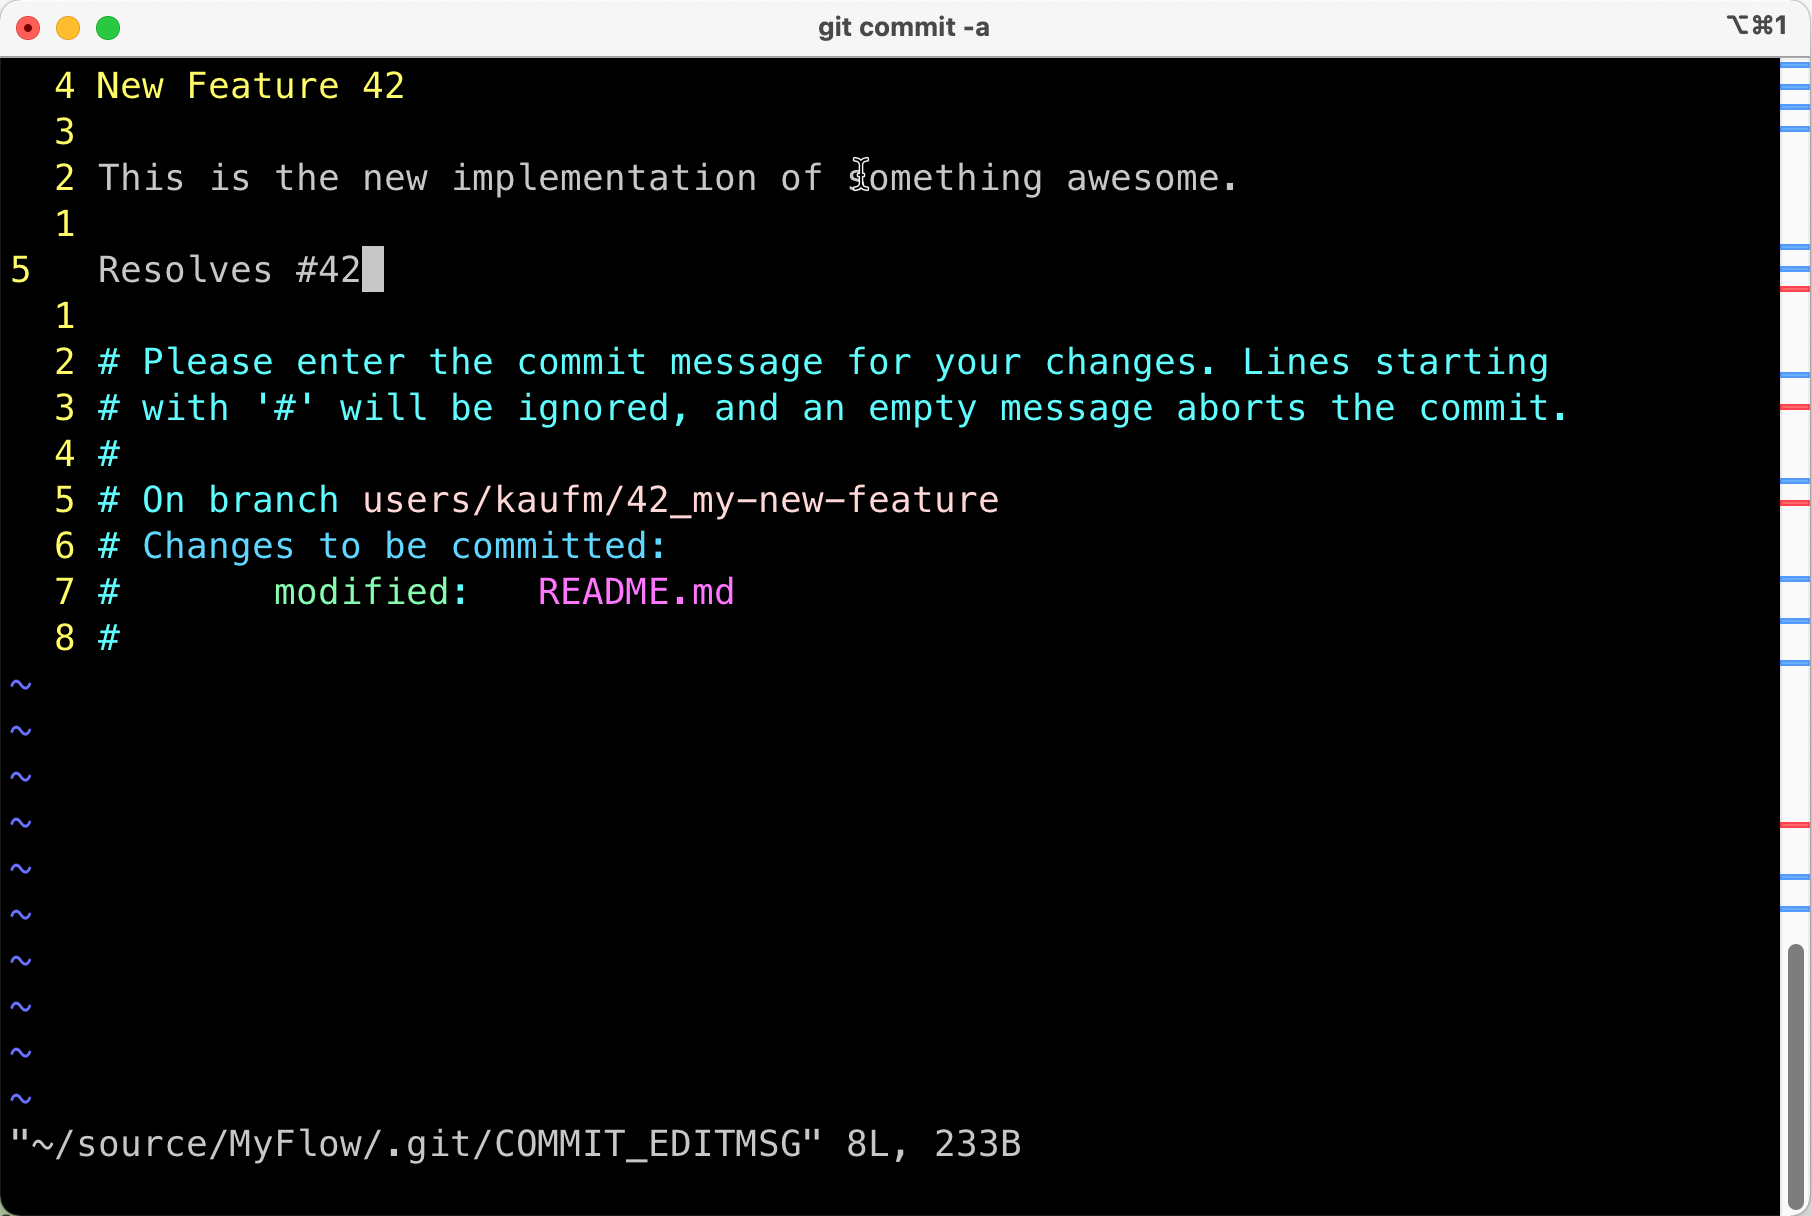
$ git push --set-upstream origin users/kaufm/42_my-new-featureNote that I did not specify the -m parameter in git commit to specify the commit message. I prefer that my default editor opens the COMMIT_EDITMSG so that I can edit the commit message there. This way I can see the files with changes and I have a visual help where the lines should break. Make sure you have set your editor correct if you want to do this. If, for example, you prefer visual studio code, you can set it as your default editor with: $ git config --global core.editor "code --wait"
Now you create a pull request in draft mode. This way the team knows that you are working on that specific topic. A quick view on the list of open pull requests should give you a nice overview on the topics the team is currently working on.
Note that I use the <a href="https://cli.github.com/" target="_blank" rel="noreferrer noopener">GitHub CLI</a> to interact with pull requests as I find it easier to read and understand than to use screenshots of the web UI. You can do the same using the web UI.$ gh pr create --fill --draftThe option --fill will automatically set the title and description of the pr from your commit. If you have omitted the -m argument when committing your changes and if you have added a multi-line commit message in your default editor, the first line will be the title of the pull request and the rest of the message the body. You could also set title (--title or -t) and body (--body or -b) directly when creating the pull request instead of using the --fill option.
You can now start working on your topic. And you can use the full power of git. If you want to add changes to your previous commit, for example, you can do so with the --amend option:
$ git commit --amendOr, if you want to combine the last three commits into one single commit:
$ git reset --soft HEAD~3
$ git commit
If you want to merge all the commits in the branch into one commit you could run the following command:
$ git reset --soft main
$ git commit
If you want complete freedom to rearrange and squash all your commits you can use interactive rebase:
$ git rebase -i mainTo push the changes to the server you use the following command:
$ git push origin +<branch>In our example:
$ git push origin +users/kaufm/42_my-new-featureThe plus before the branch name causes a force push to the specific branch only. If you are not messing with your branch history, you can perform a normal git push without specifying origin and the branch name. If your branches are well protected and you know what you are doing a normal force push might be more convenient:
$ git push -fIn case you want help or opinions of your teammates on your code at that stage, you can mention them in comments in the pull request. If they want to propose changes, they use the suggestions feature in pull request comments. This way you apply the changes, and you can make sure that you have a clean state in your repository before doing so.
Whenever you feel your work is ready, you change the state of your pull request from draft to ready and activate auto-merge:
$ gh pr ready
$ gh pr merge --auto --delete-branch --rebase
I’ve specified --rebase here as the merge method. This is a good merge strategy for small teams that like to craft a good and concise commit history but still want it to be linear. If you prefer --squash or --merge adjust your merge strategy accordingly. Squash is good for bigger teams or teams that are not used to craft very concise commit messages. Merge is only good for small teams with only short-lived branches that want to keep their branches visible in the history.
Your reviewers can still create suggestions in their comments, and you can keep collaborating. But once all approvals and all automated checks have completed, the pull request will be merged automatically, and the branch gets deleted. The automated checks run on the pull_request trigger and can include installing the application in an isolated environment and running all sorts of tests.
If your pull request has been merged and the branch has been deleted, you clean up your local environment:
$ git switch main
$ git pull --prune
This will change your current branch to main, pull the changes from the server, and delete the local branches that has been deleted on the server.
The perfect git workflow for your team depends on many things:
There is no one-size-fits-all solution. But, teams need some kind of guidance, either if they are new to git or change the platform. Or, if they have an old workflow that they have to adopt to a new release process or git system.
In this post I showed you the basics of MyFlow: a collection of best practices to work in a trunk-based workflow with git (in this case GitHub). In the next part I will cover releases, hotfixes, and semantic versioning.

