Uncategorized
Enterprise Azure ARM Templates 
Pascal Naber 27 Dec, 2016


Creating resources in the Azure cloud can be done in many ways. If you’ve ever used Azure, you most certainly made a resource using the Portal experience at portal.azure.com. Besides this portal, you can also use PowerShell or the Azure CLI. When you want to manage your infrastructure from an application, you can work with an SDK and, for example, create a resource using C#. Finally, there are also options to manage resources using templates. ARM templates have been around for quite a while, and now you have a new option: Bicep! Bicep aims to make managing your infrastructure in a declarative way much easier than it was with ARM templates. ARM templates are written in JSON and are therefore harder to write, read, and much larger in size. It is also quite hard to break up ARM templates into multiple modules to create maintainable and reusable templates. Bicep is a domain-specific language (DSL) aiming to solve all of these problems for us!
All the different options you have to manage infrastructure in Azure have one thing in common: they use the Azure Resource Manager underneath. The below diagram shows the various options in relation to the Azure Resource Manage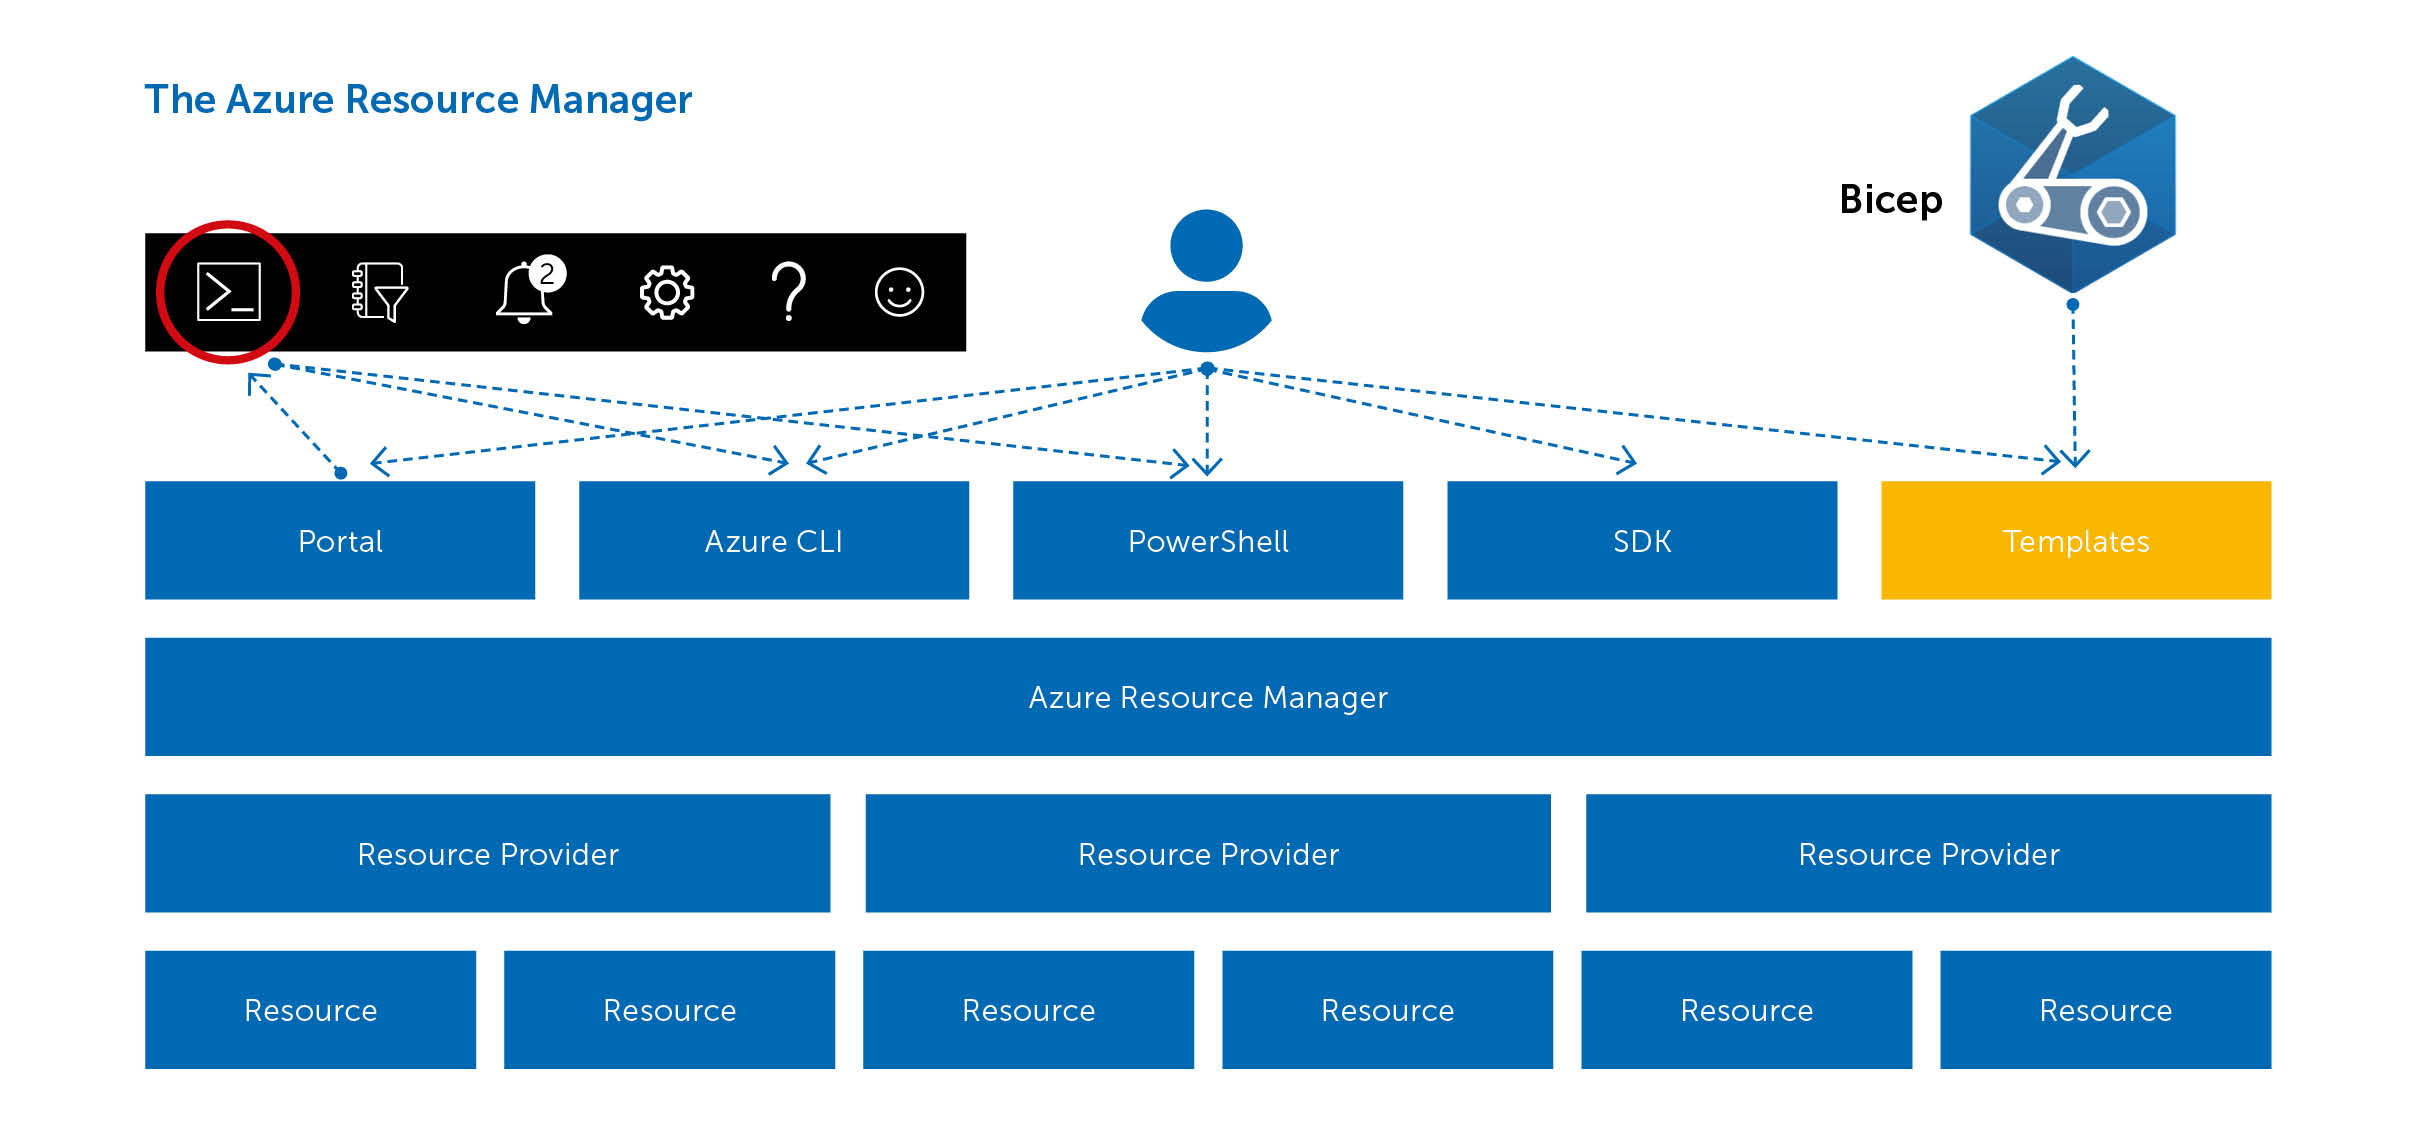 The first row in the diagram shows you the various options we just mentioned; the portal, Azure CLI, PowerShell, SDKs, and templates. On the second row, you see the Azure Resource Manager. It’s the service in Azure that allows you to deploy and manage resources. The actual work of creating resources is delegated to a resource provider. There is, for example, a resource provider for everything around virtual machines and another one for all things related to Web Apps.
Except for the portal, all these options allow you to create and manage your infrastructure using Infrastructure as Code practices in a descriptive model. As with source code for your applications, you get the same benefits as versioning, auditability, traceability, and repeatability by storing it in source control and deploying it using a deployment pipeline.
Now that you know a bit about where to place Bicep in the Azure-provisioning landscape, let’s dive in by creating a simple resource using Bicep. Before you can start, you need to install a few tools:
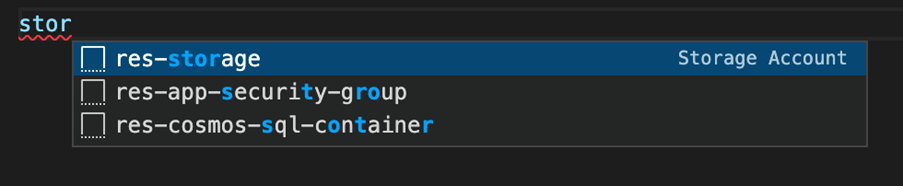
For example, we will create a storage account in Azure using Bicep. Open Visual Studio Code and create a new file called "storageAccount.bicep". Within that file, start typing ‘stor’. You will see the extension will immediately begin helping you write the templates by presenting you with a few snippets.
Hit Enter and the snippet will be inserted. It looks like the following example:
resource storageaccount 'Microsoft.Storage/storageAccounts@2021-02-01' = {
  name: 'name'
  location: location
  kind: 'StorageV2'
  sku: {
    name: 'Premium_LRS'
  }
}
The snippet starts with the keyword resource, indicating you want to create a resource. Next is the deployment’s name, followed by the resource type and its version. Within the curly braces, you find the details of the resource like its name, location, and SKU.
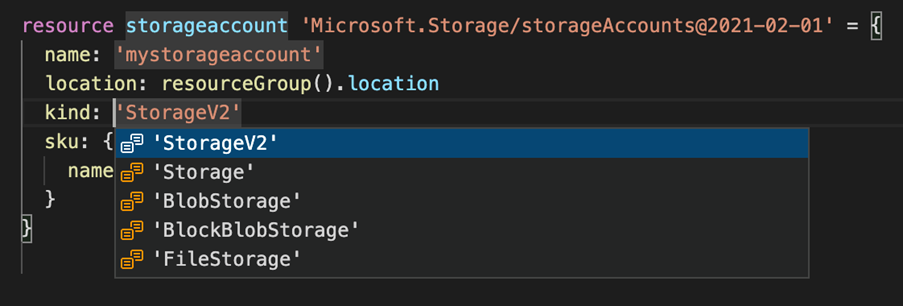
While you haven’t touched your mouse or keyboard yet, you will see that the editor selected the deployment name, allowing you to change that value. When you hit the tab key, you will automatically move to each property you can edit. Again, a nice benefit of the extension. Notice how the extension also lists available options for the properties with a fixed set of options, like the ‘kind’ on the storage account. That saves you from having to look them up and make typing errors.
When you’ve edited the properties, your storage resource looks like this example:
resource stg 'Microsoft.Storage/storageAccounts@2021-04-01' = {
  name: 'mystorageaccount'
  location: resourceGroup().location
  kind: 'StorageV2'
  sku: {
    name: 'Standard_LRS'
  }
}
The name of the storage account is currently hardcoded. That is not ideal since you want to use this template for multiple environments, such as test and production. The Microsoft naming convention recommends making the name reflect that. In Bicep, you can use a parameter to provide values, like the environment, at runtime.
Define a parameter as follows:
param env string = 'test'You start with the keyword ‘param’ followed by its name. Next, you define its type, in this example, a string. Other options are an integer, bool, array, or object. Optionally, you can set a default value like ‘test’ in the example above. The same can be done for the location property of the storage account, or you can use a function like in the previous example to get the location from the resource group in which it lives.
In addition to parameters, we can use variables for values that you want to reuse across your templates but are not provided at runtime. Creating a variable that holds the name of the storage account looks like this:
var storageAccountName = 'stordemo${env}'Notice how you can use string interpolation to combine ‘stordemo’ with the ‘env’ parameter into the variable. The result of using both parameters and a variable is shown below:
param env string = 'test'
param location string = 'westeurope'

var storageAccountName = 'stordemo${env}'

resource stg 'Microsoft.Storage/storageAccounts@2021-04-01' = {
  name: storageAccountName
  location: location
  kind: 'StorageV2'
  sku: {
    name: 'Standard_LRS'
  }
}
Another interesting feature that you can add is the use of the output keyword. That allows you to, for example, return the URL of the blob endpoint on the storage account. Defining an output looks like this:
blobEndpoint string = stg.properties.primaryEndpoints.blob0Defining an output is similar to defining a parameter. The output keyword is used, and it’s given a name: ‘blobEndpoint’. You specify its type and then provide a value. Notice how you can use the deployment’s name and the dot notation to get the properties of a resource.
Now that you have written the first resource, let’s deploy to Azure. The funny thing is that Azure itself doesn’t know Bicep at all. Azure understands good old ARM templates, so your Bicep template will be transpiled into an ARM template and deployed to Azure. You can do that transpilation yourself, but the Azure CLI also supports deploying a bicep file directly and will do the transpilation for you. Let’s do the transpilation to see the result using the Azure CLI. Run:
az bicep build -f storageAccount.bicepThe output is the following ARM template:
{
  “$schema”: “https://schema.management.azure.com/schemas/2019-04-01/deploymentTemplate.json#”,
  “contentVersion”: “1.0.0.0”,
  “metadata”: {
    “_generator”: {
      “name”: “bicep”,
      “version”: “0.4.1008.15138”,
      “templateHash”: “7691361711088743744”
    }
  },
  “parameters”: {
    “env”: {
      “type”: “string”,
      “defaultValue”: “tst”
    },
    “location”: {
      “type”: “string”,
      “defaultValue”: “westeurope”
    }
  },
  “functions”: [],
  “variables”: {
    “storageAccountName”: “[format(‘stordemo{0}’, parameters(‘env’))]”
  },
  “resources”: [
    {
      “type”: “Microsoft.Storage/storageAccounts”,
      “apiVersion”: “2021-04-01”,
      “name”: “[variables(‘storageAccountName’)]”,
      “location”: “[parameters(‘location’)]”,
      “kind”: “StorageV2”,
      “sku”: {
        “name”: “Standard_LRS”
      }
    }
  ],
  “outputs”: {
    “blobEndpoint”: {
      “type”: “string”,
      “value”: “[reference(resourceId(‘Microsoft.Storage/storageAccounts’, variables(‘storageAccountName’))).primaryEndpoints.blob]”
    }
  }
}
You immediately see that the ARM template is almost three times as large as the bicep equivalent! You will probably also agree that the bicep version is much more readable than the JSON in this ARM template. Those are just a few of the benefits of using Bicep over ARM tempaltes.
We will use the Azure CLI to do the deployment. You first need to login and select the correct subscription using the following commands:
az login

az account set -s
As every resource in Azure lives in a resource group, you first need to create that. Later, we will see how to create one with Bicep. For now, use the Azure CLI:
az group create -l westeurope -n rg-bicepdemo-testNow that your resource group is ready, you can deploy the template using the command below:
az deployment group create --resource-group rg-bicepdemo-test --template-file storageAccount.bicepWhen you do not provide values for the parameters, the defaults in the template will be used. The following command shows how to provide a parameter while deploying the template. Passing parameters allows you to reuse the template and target multiple environments.
 az deployment group create --resource-group rg-bicepdemo-test
    --template-file storageAccount.bicep
    --parameters '{ "env": { "value": "prod" } }'
Now open the Azure portal and verify the storage account has been created.
If you continue to add resources to the file we just created, it will get bigger and bigger. Eventually, it will become harder to read and maintain, and the template will get harder and harder to reuse. Luckily, Bicep has the concept of modules. Modules allow you to break up your template into smaller, reusable parts. The template you’ve just created is an excellent example of what can be in a module. Now let’s create the resource group you created manually using the Azure CLI using Bicep and see how we can use the storage account template as a module. Start by creating a new file called "main.bicep", and add the following snippet to the "main.bicep" to create the resource group:
param env string = 'test'
param location string = 'westeurope'

resource rg 'Microsoft.Resources/resourceGroups@2021-04-01' = {
  name: 'rg-bicepdemo-${env}'
  location: location
}
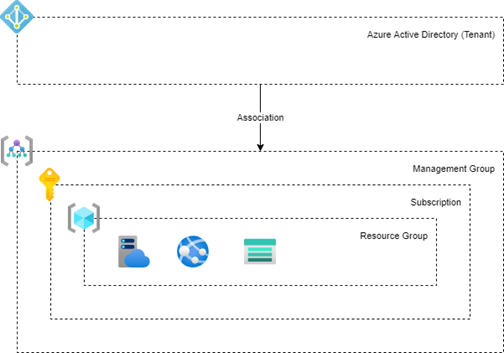
The above snippet creates a Resource Group of which the deployment is called ‘rg’. Now you’ve done that, you will see that VS Code will show an error on the above new resource. By default, a bicep template is deployed at the scope of a resource group. As you may know, in Azure, there are different levels at which we can deploy resources. We call these the deployment scopes. At the root, you have your Azure Tenant. That can contain one or more Management Groups. These can contain one or more subscriptions, and each subscription can contain one or more resource groups. Finally, the resource groups contain the actual resources like Virtual Machines, a Web App or Storage Account. This hierarchy allows you to group and manage your resources in a structured way and is shown in the image below.
You get the above error since you cannot create a resource group within a resource group; the deployment scope is wrong. A resource group needs to be deployed at the subscription scope, so you need to add the following line to the top of the "main.bicep":
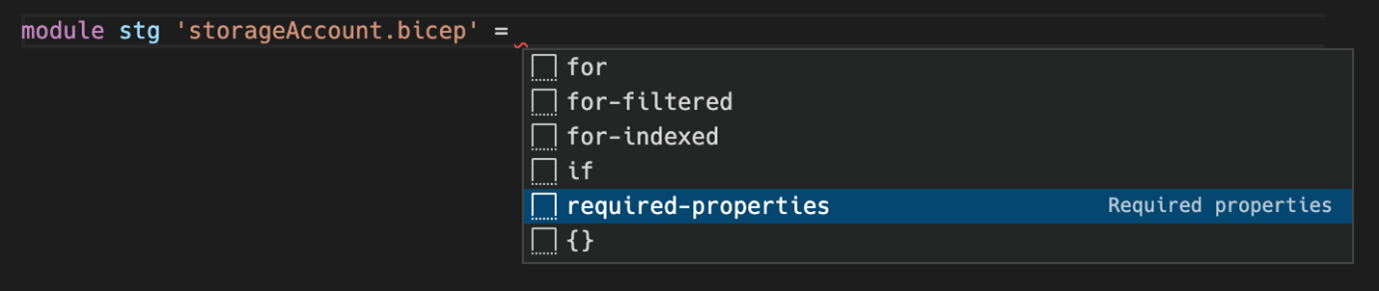
targetScope = 'subscription'The error should disappear. To use the storage account file as a module, you use the ‘module’ keyword instead of the ‘resource’ keyword. You give it a name like you do when using the ‘resource’ keyword. Instead of specifying a type, you now reference the just created module using its path. Below the resource group, start typing ‘module stg ‘, and VS Code should show you all available modules:

Select the storageAccount.bicep. Type ‘= <space>’ and then select the ‘required-properties’ option in the drop-down.
The generated snippet looks like this:
module stg 'storageAccount.bicep' = {
  scope:
  name:
}
On the first line in that module, you find ‘scope’. That is where you define to what scope this module should be deployed. Remember that the "main.bicep" template targets the subscription scope, but a storage account can only be deployed within a resource group. This scope property allows you to set it. You simply do that by using the name of the resource group you declared earlier like so:
module stg 'storageAccount.bicep' = {
  scope: rg
  name: 'storage'
}
Remember that the storage account also has two parameters. They were not added when you created the module using the ‘required-properties’ since they have a default value. You can pass a value to them by specifying params on the module like so:
module stg 'storageAccount.bicep' = {
  scope: rg
  name: 'storage'
  params: {
    env: 'prod'
  }
}
Deploying this template is slightly different from when you deployed storageAccount.bicep previously Since we now target the subscription scope, you need to specify that in the command. The command now becomes:
az deployment sub create --template-file main.bicep -l westeuropeNotice that instead of group you now use sub to indicate the different deployment scope. When you run the command, it should succeed, and the result in Azure should be the same since the resource group and storage account already exist.
In this article, you’ve learned how easy it is to get started with Bicep to create and deploy your first resource. You’ve also learned how to create a module to craft small, reusable, and maintainable Bicep templates. If you want to know more about sharing these modules within your organization, then make sure to find the article on ” by Erick Segaar elsewhere in this magazine.
Want to know more about Infrastructure as Code on Azure? Erwin, together with two friends, wrote a book on it! It discusses ARM templates and, of course, Bicep. It shows how to deploy these templates using Azure DevOps or GitHub Actions, talks about sharing templates across the organization, how to govern your Azure environment using Azure Policy, and much more. Find out more and buy the book at https://www.manning.com/books/azure-infrastructure-as-code.
These days, it is very common that we deploy our software in a fully automated fashion across environments. It has become the standard. That seems to be less the case for the infrastructure that these applications run on, whether in the cloud or on-premises. Infrastructure is often created and maintained manually, and that quickly becomes a problem in competitive markets or highly regulated environments. Without automation, over time, environment drift will occur. Each environment becomes slightly different configured and cannot be reproduced automatically. These inconsistencies among environments lead to issues during application deployments, cause outages, and very hard to catch bugs as each environment behaves a little differently. Infrastructure as Code (IaC) can help solve problems like this. It is the management of infrastructure in a descriptive model, using the same versioning and deployment principles as DevOps teams use for source code. The infrastructure is written in well-documented, readable languages. Easy to review or reason about. Especially in cloud environments, this allows teams to iterate quickly and deploy their changes in a fast and reliable way. It gives teams the opportunity to create a whole new and separate environment for easy and isolated testing, spinning them up and tearing them down in minutes.
Various tools are available to create infrastructure using IaC. Last year, Microsoft announced yet another one: Bicep. It is the successor of ARM templates and has a lot of benefits. ARM templates are written in JSON. That makes them hard to write, read, and therefore maintain. They tend to become very large quite quickly and it is difficult to split them up into multiple files for reuse.
Bicep, On the other hand, is a Domain Specific Language (DSL) that is easy to learn, write, and read. Splitting up templates in modules is very straightforward, enabling the creation of reusable components and maintainable infrastructure. Deployment is easy using industry-standard tools, and support is included in the standard Azure support plans.