Azure
Dutch Azure Meetup 
Marco Mansi 15 Apr, 2016


I’ve always been fascinated by the concept of a simulation; the notion of mimicking a system in nature to determine evidence and derive decisions based on it. Simulations can be used across complex systems which exist in many areas such as nature, engineering, sporting odds and economics. The availability of modern technology affords us the ease to perform these types of simulations without having to spend an excess amount of time and money to perform them. This blog article will explore writing and executing a simulation with high performance compute resources in Azure.
A specific type of simulation that can be employed is the Monte Carlo simulation. At a high-level this is a powerful approach to model and examine complex systems which involve randomness and uncertainty. The simulations will generate results on a probability distribution where they can be analyzed to draw decisions based on the outcome.
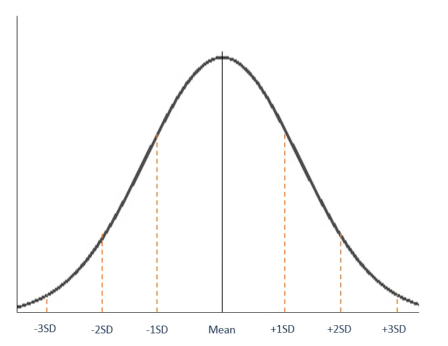
Normal distribution (or Gaussian distribution) can be used in a Monte Carlo simulation as the probability distribution. If you remember back to your statistics or calculus classes, normal distribution is characterized by the mean (center of the bell curve). The standard deviation are the areas to the left and right of the mean.
The details of the Monte Carlo simulations are outside of the scope of this blog. If you would like to learn more check this link out.
When performing a Monte Carlo simulation, increasing the number of iterations of the simulation tends to improve the accuracy and reliability of the results. More iterations will create a larger sample size reducing the random variability of the simulation itself. In other words, the more simulations you perform, the better your results will be. Now for simple models, it’s probably fine performing a simulation on a laptop or your home desktop. If you have a complex model and you require the simulation be performed in a short amount of time, the Cloud offers a fantastic option.
I have written a program in C# which will simulate the time it takes to complete a software development project by comparing three different teams with different personnel. I’ve also used this program to execute thousands (easily millions) of simulation iterations leveraging one of Azure’s high performance compute offerings, Azure Batch.
The first step in running a Monte Carlo simulation using Azure Batch is to define a model by writing a program. I created a C# solution called ‘consulting-team-simulation’ and a corresponding project called ‘team-simulator’. The program ‘team-simulator’ will run N simulation iterations across a normal distribution for three different software development teams. This is a simple example used to demonstrate how a model can be programmed given this scenario. The teams used in the simulation are as follows:
The time projection is calculated for each team using a simple model. Using Agile story points, the total estimated points of the project is assigned an arbitrary value. Next, each developer’s point velocity is determined. Since some developers can complete a higher number of points than others, this is taken into consideration in the logic. Once this is complete, the duration of the project is calculated by the developer’s velocity and the presence of a project manager or QA tester either increases or reduces the total time projection. The details of the logic can be seen in the following code snippet:
internal double GetWeeklyProjection()
{
var random = new Random();
const int hoursInWorkWeek = 40;
const double existingProjectManagerFactor = .45;
const double lackOfProjectManagerFactor = 1.3;
const double qaTesterFactor = 0.5;
var developerPerformance = new List<(double weeklyVelocity, double pointsPerHours)>();
//Get the random weekly velocities for each dev (factor this out)
var developerCounter = NumberOfDevelopers;
while (developerCounter > 0)
{
//using a random base point value between 3 and 8 points
var weeklyVelocity = (double)random.Next(3, 8);
var pointsPerHour = weeklyVelocity / 40;
developerPerformance.Add((weeklyVelocity, pointsPerHour));
developerCounter--;
}
var pointsCounter = 0.0;
var developerHoursForProject = 0;
while (pointsCounter < TotalPoints)
{
pointsCounter += developerPerformance.Sum(dp => dp.pointsPerHours);
developerHoursForProject++;
}
//add random drag hours for project
var totalProjectHours = developerHoursForProject * GetRandomVariance(random);
//Estimating having a project manager would reduce hours by 45% and without one would delay project by 30%
if (NumberOfProjectManagers > 0)
{
totalProjectHours -= (totalProjectHours * existingProjectManagerFactor);
}
else
{
totalProjectHours += (totalProjectHours * lackOfProjectManagerFactor);
}
if (NumberOfQaTesters > 0)
{
totalProjectHours += developerHoursForProject * qaTesterFactor;
}
return totalProjectHours / hoursInWorkWeek;
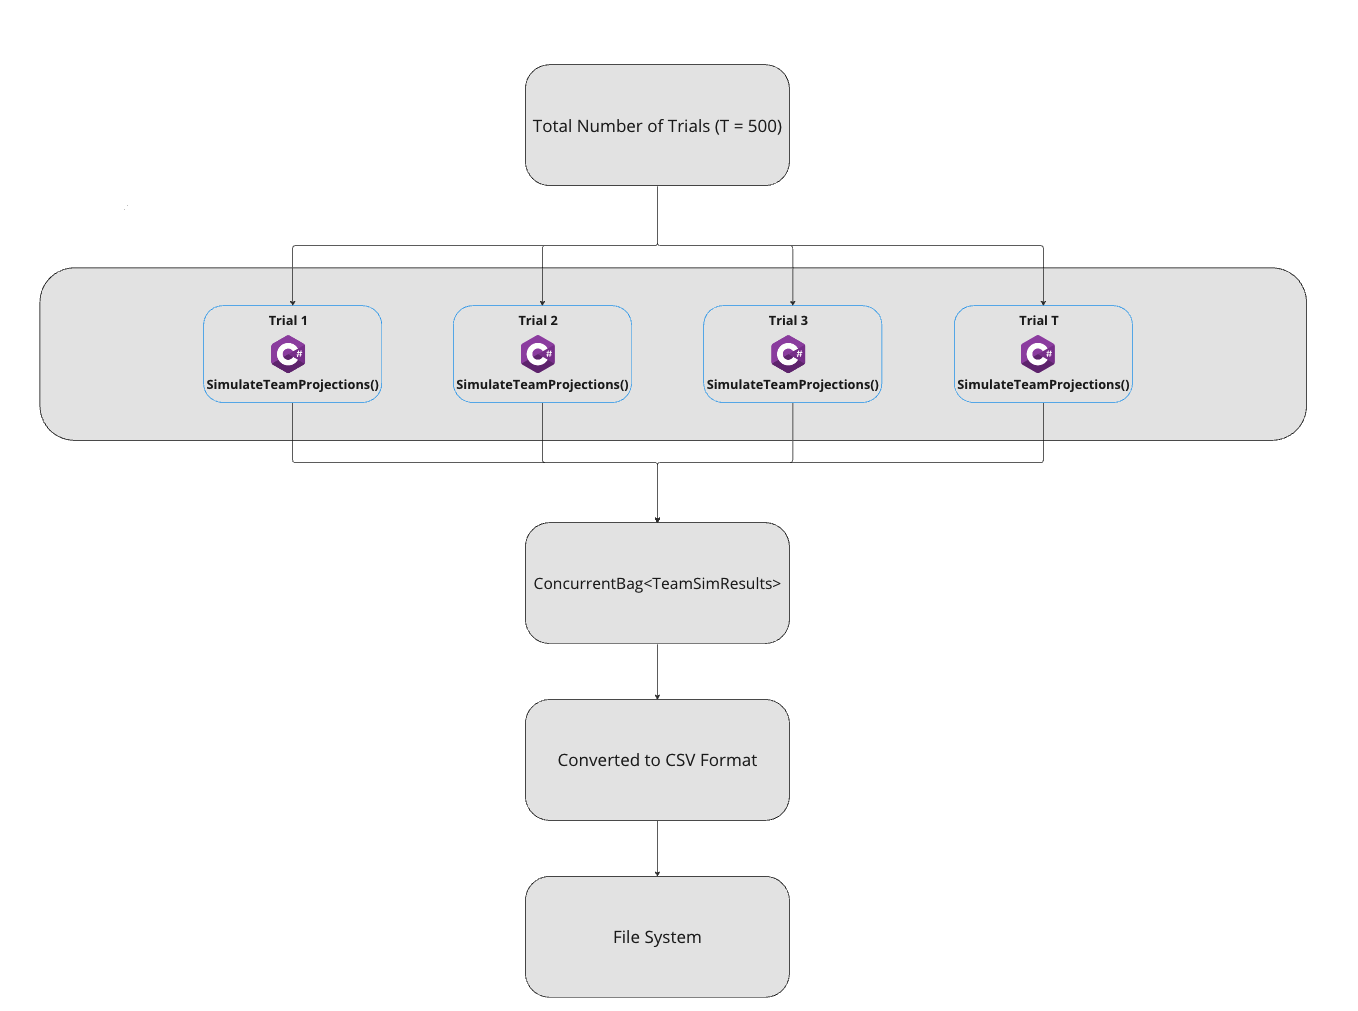
}Once the initial time projections are calculated for each team, the projections are used as the mean over a normal distribution. Each team will have one time duration projection. For example, the megaTeam may have a projection of 30 hours and the gigaTeam may have a projection of 25 hours. This is where the simulation will be executed, randomly generating as many projection values as you have trials over a normal distribution curve. For example, if you want 500 trials, the program will produce 500 projections over the curve.
I’ve done this using the Task Parallel Library (TPL) for concurrency and performance. A new task is queued up for execution for each iteration (or trial) of the simulation. The SimulateTeamProjections() method will be called across multiple threads in parallel. The overview of the concurrency is seen here:
The method which performs the simulation and calculates the random simulated projection is using the InverseLeftProbability method from the statistics namespace, Meta.Numerics.Statistics.Distribution:
private static void SimulateAllTeamProjections(List<double> teamProjections)
{
    var simulationResult = new TeamSimResult();
    var trialSimulatedResults = new List<double>();
    foreach (var projection in teamProjections)
    {
        //we simulate each trial over a normal distribution curve
        var stdDev = Convert.ToDouble(0.5);
        var normalDistribution = new NormalDistribution(projection, stdDev);
        var randomDouble = GetRandomNumber();
        var simulatedProjection = normalDistribution.InverseLeftProbability(randomDouble);
        trialSimulatedResults.Add(Math.Round(simulatedProjection, 2));
    }

    simulationResult.MegaTeamTime = trialSimulatedResults[0];
    simulationResult.GigaTeamTime = trialSimulatedResults[1];
    simulationResult.PetaTeamTime = trialSimulatedResults[2];
    _simResultsBag?.Add(simulationResult);
}
Once the time projections for all trials have been simulated over a normal distribution curve, the results are output to the file system in a csv format.
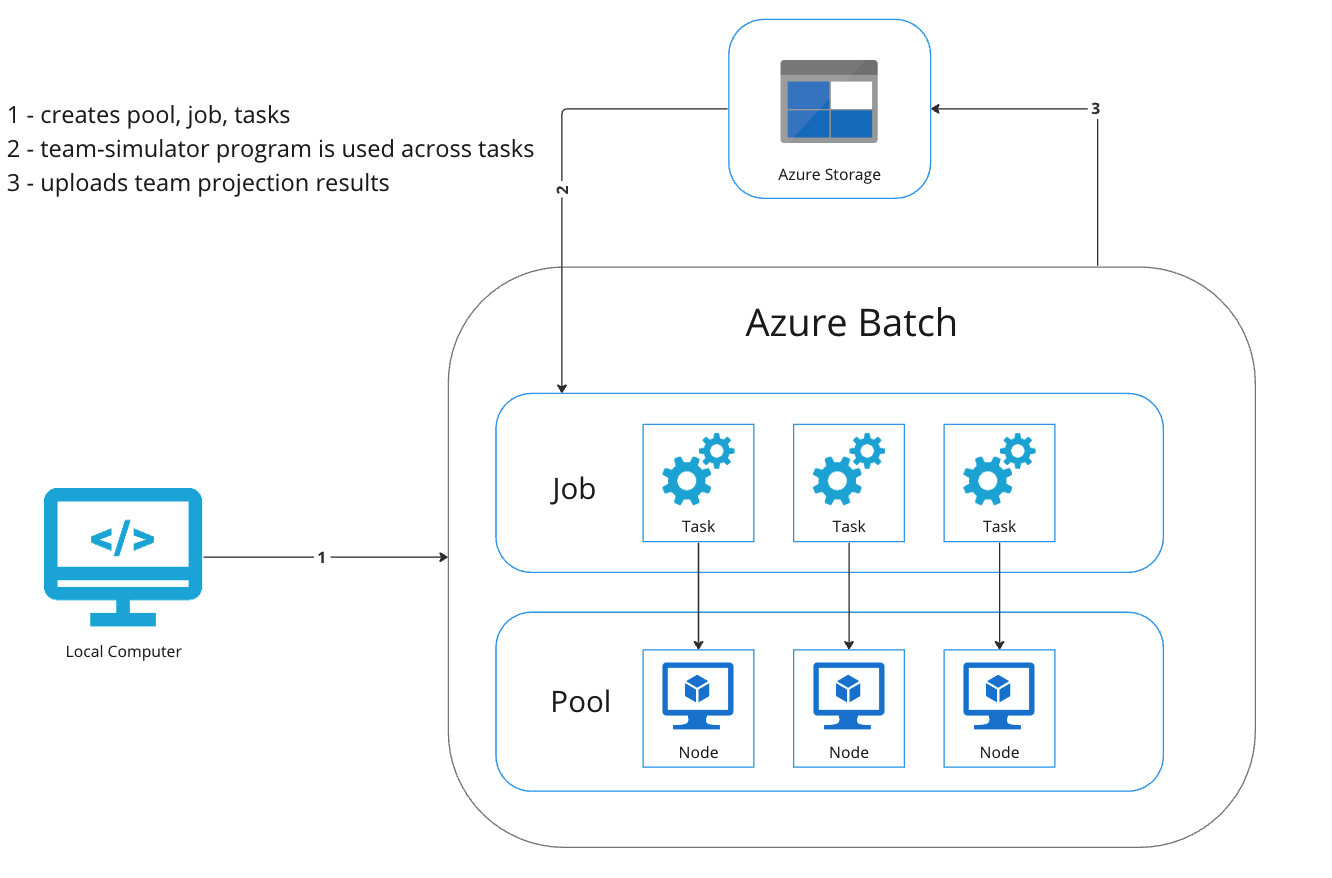
Azure Batch is a high-performance computing offering which runs large-scale parallel and batch computing workloads. It’s best suited for time intensive complex simulations. Before moving forward, we should define some of the components which are used to run simulations in Azure Batch. They include:
Each of these components can be customized and configured using the Batch SDK. It is available across many languages including, C#, Java, Node and Python. I have written logic which programmatically creates and sets the pool, job, and tasks. The high-level flow is illustrated here:
I won’t include the steps outlined in the Microsoft documentation to set up the Azure Batch resources within the portal. You can also use infrastructure as code (such as Bicep) to provision the resources as well. The steps are outlined here.
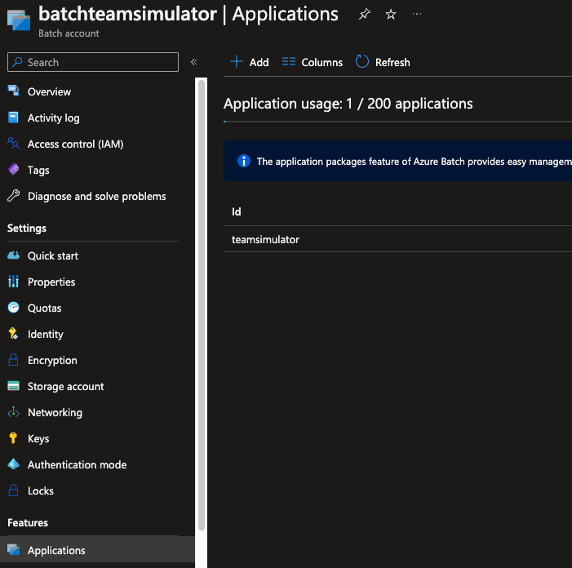
Getting back to our ‘team-simulator’ program, the first step in running the program across nodes in Azure Batch is to publish the console application to a self-contained executable. This is very important since the nodes may not have the .NET runtime installed. Another important note to keep in mind is to make sure you build the package in the appropriate chipset. Obviously (or not so obviously) if the nodes have x64 chips, make sure not to build the application in ARM64. You’ll want to zip up the build output and add it to a storage account which is linked to Azure Batch as seen below:
Once the application has been added to the storage account linked to Azure Batch. It’s time to leverage the Batch SDK to programmatically run the simulation.
You’ll need the batch account name, account key, and the account URL to connect to the Batch account within Azure. You’ll also need the storage account credentials in your code specifically the storage account name and key.
As you can see from the code below, I’m first creating a connection to the storage account, getting a reference to the blob container, and creating the ‘output’ container if it does not exist. Once this is done, you can see the batch client is passed in as a parameter to 3 methods which will be responsible for creating the pool, job, and tasks. The MonitorTasks() method will close the program once the simulation completes. It’s usually good practice to include code which will clean up the resources in Azure as well. There are several examples of getting started with Azure Batch, check out this GitHub repo for the details.
const string storageConnectionString = $"DefaultEndpointsProtocol=https;AccountName={StorageAccountName};AccountKey={StorageAccountKey}";

var storageAccount = CloudStorageAccount.Parse(storageConnectionString);

// Create the blob client, for use in obtaining references to blob storage containers
var blobClient = storageAccount.CreateCloudBlobClient();
const string outputContainerName = "output";
var outputContainerSasUrl = GetContainerSasUrl(blobClient, outputContainerName, SharedAccessBlobPermissions.Write);
var sharedKeyCredentials = new BatchSharedKeyCredentials(BatchAccountUrl, BatchAccountName, BatchAccountKey);

await CreateContainerIfNotExistAsync(blobClient, outputContainerName);

using var batchClient = BatchClient.Open(sharedKeyCredentials);
await CreatePoolIfNotExistAsync(batchClient, PoolId);
await CreateJobAsync(batchClient, JobId, PoolId);
await AddTasksAsync(batchClient, JobId, outputContainerSasUrl);
await MonitorTasks(batchClient, JobId, TimeSpan.FromMinutes(30));
Within the CreatePoolIfNotExistAsync() method, the virtual machine configuration is defined and also a few pool properties such as tasks per node, the scheduling policy, and the application the pool should be using.
Console.WriteLine("Creating pool [{0}]...", poolId);

var imageReference = new ImageReference(
    publisher: "MicrosoftWindowsServer",
    offer: "WindowsServer",
    sku: "2016-datacenter-smalldisk",
    version: "latest");

var virtualMachineConfiguration =
    new VirtualMachineConfiguration(
        imageReference: imageReference,
        nodeAgentSkuId: "batch.node.windows amd64");

var pool = batchClient.PoolOperations.CreatePool(
    poolId: poolId,
    targetDedicatedComputeNodes: DedicatedNodeCount,
    targetLowPriorityComputeNodes: LowPriorityNodeCount,
    virtualMachineSize: PoolVmSize,
    virtualMachineConfiguration: virtualMachineConfiguration);

pool.TaskSlotsPerNode = 4;
pool.TaskSchedulingPolicy = new TaskSchedulingPolicy(ComputeNodeFillType.Pack);

pool.ApplicationPackageReferences = new List<ApplicationPackageReference>
{
    new()
    {
        ApplicationId = AppPackageId,
        Version = AppPackageVersion
    }
};

await pool.CommitAsync();
The CreateJobAsync() method is trivial:
private static async Task CreateJobAsync(BatchClient batchClient, string jobId, string poolId)
{
    Console.WriteLine("Creating job [{0}]...", jobId);
    var job = batchClient.JobOperations.CreateJob();
    job.Id = jobId;
    job.PoolInformation = new PoolInformation { PoolId = poolId };
    await job.CommitAsync();
}
The AddTasksAsync() method will loop through the number of tasks defined, and for each task define the path of the application and how to execute it within the context of the node. The other interesting logic within this method is defining where the output of the program should go. You can see the outputFile object specifies the file pattern and the destination. What this means is when the task successfully completes, all files which have a .csv extension will be uploaded to the blob output container within the storage account.
private static async Task AddTasksAsync(BatchClient batchClient, string jobId, string outputContainerSasUrl)
{
    // Create a collection to hold the tasks added to the job:
    var tasks = new List<CloudTask>();

    for (var i = 0; i <= NumberOfTasks; i++)
    {
        // Assign a task ID for each iteration
        var taskId = $"Task{i}";
        var appPath = $"%AZ_BATCH_APP_PACKAGE_{AppPackageId}#{AppPackageVersion}%";

        var taskCommandLine = $"cmd /c {appPath}\team-performance-simulator.exe";

        // Create a cloud task (with the task ID and command line) and add it to the task list
        var task = new CloudTask(taskId, taskCommandLine)
        {
            ResourceFiles = new List<ResourceFile>()
        };

        // Task output file will be uploaded to the output container in Storage.
        var outputFileList = new List<OutputFile>();
        var outputContainer = new OutputFileBlobContainerDestination(outputContainerSasUrl);
        var outputFile = new OutputFile($"**\*.csv",
            new OutputFileDestination(outputContainer),
            new OutputFileUploadOptions(OutputFileUploadCondition.TaskSuccess));
        outputFileList.Add(outputFile);
        task.OutputFiles = outputFileList;
        tasks.Add(task);
    }
    await batchClient.JobOperations.AddTaskAsync(jobId, tasks);
}
When this program is executed, the job and tasks will be provisioned within the Batch account and the simulation will begin to execute.
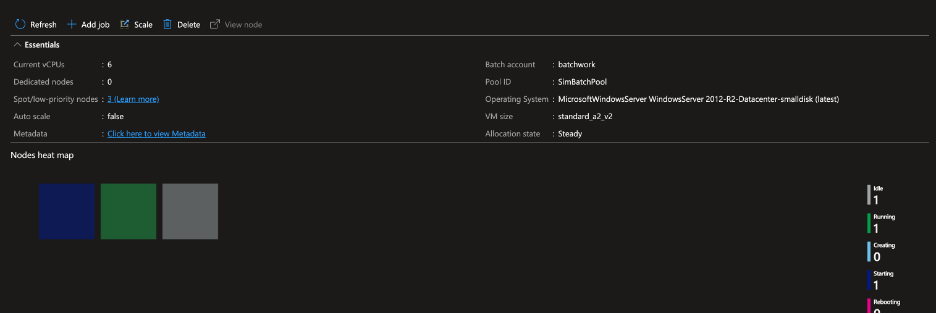
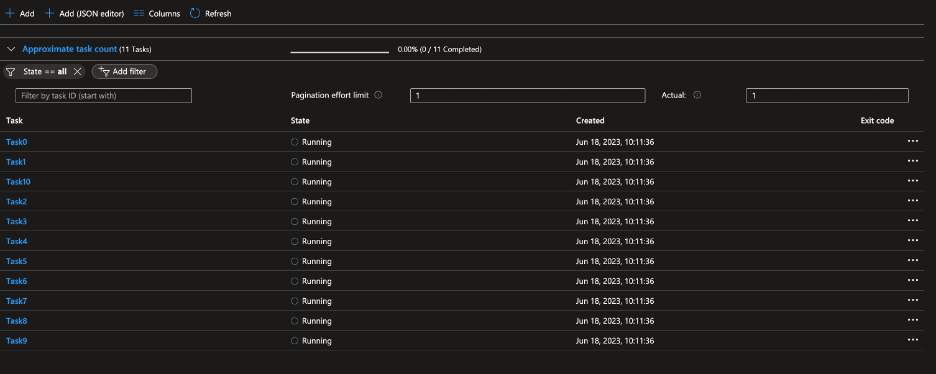
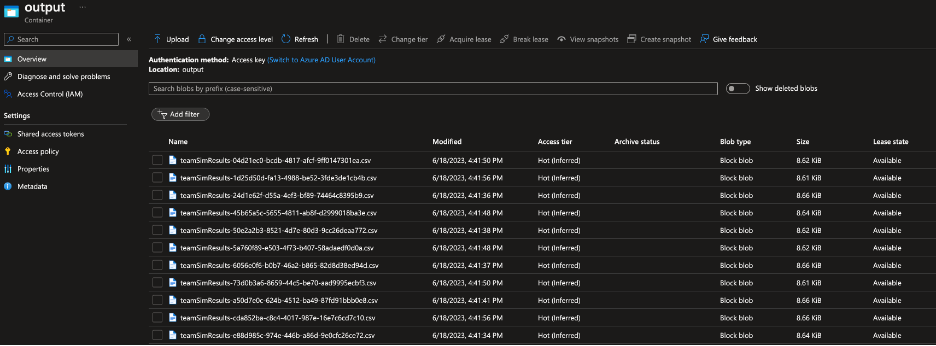
You can see from the following screenshots how the Batch service will indicate the nodes starting up, the tasks running, and the result showing the csv files from the ‘team-simulation’ program in the storage account:
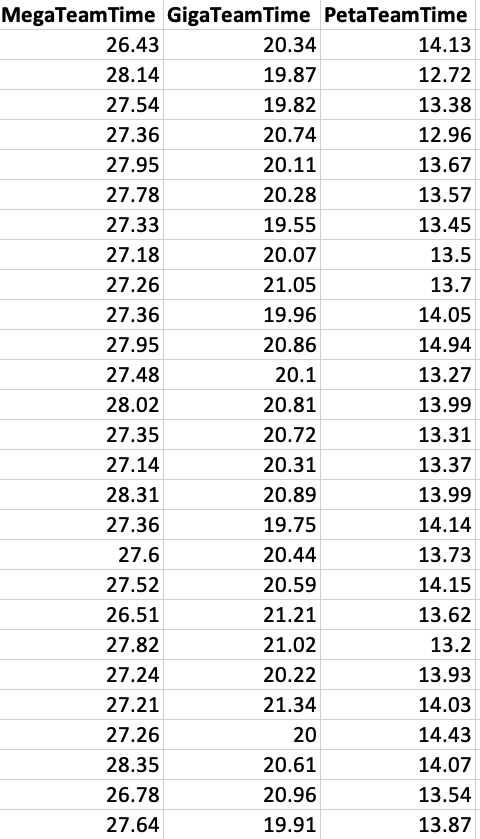
For reference, here is some of the sample data that was generated by the simulation (time is in hours):
Once the simulation has been completed, a question one might ask is how can I access the data and analyze it to make decisions. There are several approaches you can take to use the data once it’s in blob storage.
The approaches are listed below in the following table:
| Option | Description |
| Azure Synapse | Synapse provides an amazing feature where you can write SQL statements against blob storage. The SQL queries may be sufficient for analyzing and deriving decisions. This can save you time from potentially moving the data contained in the csv files to table storage or an Azure SQL database. |
| Azure Data Factory | A Data Factory pipeline can easily be written to move and transform the data contained in the csv files to an Azure SQL database contained in a warehouse or lake. Once the data is persisted in the database, queries can be written for analysis. |
| Azure Functions | A trigger can be written in a function (or durable one) to move the data into a persistent data repository of your choice. |
| Azure Logic Apps | Similar to a function, a trigger can be written, and the data can be sent to any one of the many connectors a Logic App provides. |
The power of simulations and how it can be applied to many different areas in the world is virtually limitless. Throughout this article, I hope I’ve provided insight into how Monte Carlo simulations can be executed first within a standard program and second leveraging Azure Batch. This article only scratches the surface of how complex models work and the power Azure Batch provides. I challenge you to think of an area where you can apply a simulation and use Azure Batch to streamline the workload!
The source code can be accessed via my GitHub account here.
Stay tuned for the next blog either covering another technical subject or a part in my series of engineering leadership
Follow me on Twitter here!